SIMULATION -
Please wait while the virtual machine loads. Once loaded, you may proceed to the lab section. This may take a few minutes, and the wait time will not be deducted from your overall test time.
When the Next button is available, click it to access the lab section. In this section, you will perform a set of tasks in a live environment. While most functionality will be available to you as it would be in a live environment, some functionality (e.g., copy and paste, ability to navigate to external websites) will not be possible by design.
Scoring is based on the outcome of performing the tasks stated in the lab. In other words, it doesn't matter how you accomplish the task, if you successfully perform it, you will earn credit for that task.
Labs are not timed separately, and this exam may more than one lab that you must complete. You can use as much time as you would like to complete each lab.
But, you should manage your time appropriately to ensure that you are able to complete the lab(s) and all other sections of the exam in the time provided.
Please note that once you submit your work by clicking the Next button within a lab, you will NOT be able to return to the lab.
Username and password -
Use the following login credentials as needed:
To enter your username, place your cursor in the Sign in box and click on the username below.
To enter your password, place your cursor in the Enter password box and click on the password below.
Microsoft 365 Username:
[email protected]
Microsoft 365 Password: [email protected]
If the Microsoft 365 portal does not load successfully in the browser, press CTRL-K to reload the portal in a new browser tab.
The following information is for technical support purposes only:
Lab instance: 11032396 -
You need to ensure that [email protected] receives an alert when a user establishes a sync relationship to a document library from a computer that is a member of an Active Directory (AD) domain.
To complete this task, sign in to the Microsoft Office 365 admin center.
Answer:
See explanation below.
1. Navigate to Manage Alerts in the Security & Compliance Center.
2. On the Activity alerts page, click + New.
The flyout page to create an activity alert is displayed.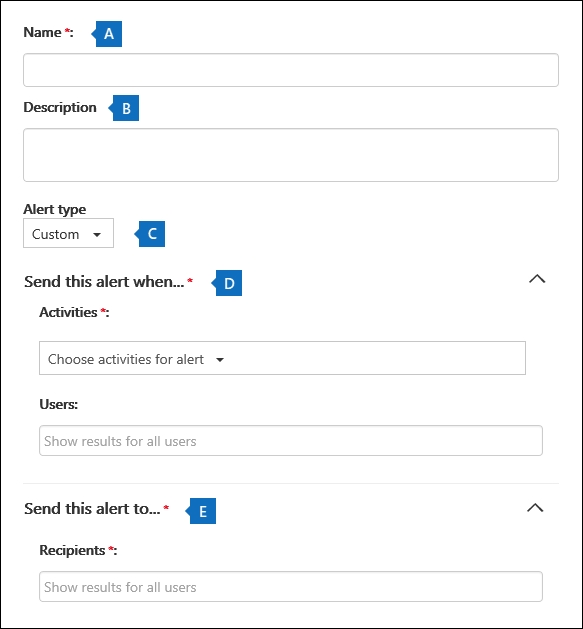
3. Complete the following fields to create an activity alert: a. Name - Type a name for the alert. Alert names must be unique within your organization. b. Description (Optional) - Describe the alert, such as the activities and users being tracked, and the users that email notifications are sent to. Descriptions provide a quick and easy way to describe the purpose of the alert to other admins. c. Alert type - Make sure the Custom option is selected. d. Send this alert when - Click Send this alert when and then configure these two fields:
✑ Activities - Click the drop-down list to display the activities that you can create an alert for. This is the same activities list that's displayed when you search the
Office 365 audit log. You can select one or more specific activities or you can click the activity group name to select all activities in the group. For a description of these activities, see the "Audited activities" section in Search the audit log. When a user performs any of the activities that you've added to the alert, an email notification is sent.
✑ Users - Click this box and then select one or more users. If the users in this box perform the activities that you added to the Activities box, an alert will be sent. Leave the Users box blank to send an alert when any user in your organization performs the activities specified by the alert. e. Send this alert to - Click Send this alert, and then click in the Recipients box and type a name to add a user's who will receive an email notification when a user (specified in the Users box) performs an activity (specified in the Activities box). Note that you are added to the list of recipients by default. You can remove your name from this list.
4. Click Save to create the alert.
The new alert is displayed in the list on the Activity alerts page.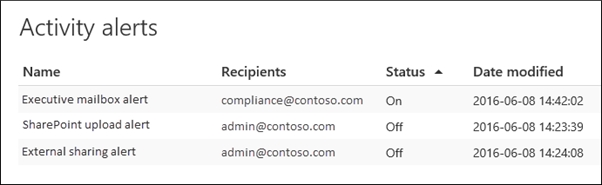
The status of the alert is set to On. Note that the recipients who will receive an email notification when an alert is sent are also listed.
Reference:
https://docs.microsoft.com/en-us/microsoft-365/compliance/create-activity-alerts?view=o365-worldwide
SIMULATION -
Please wait while the virtual machine loads. Once loaded, you may proceed to the lab section. This may take a few minutes, and the wait time will not be deducted from your overall test time.
When the Next button is available, click it to access the lab section. In this section, you will perform a set of tasks in a live environment. While most functionality will be available to you as it would be in a live environment, some functionality (e.g., copy and paste, ability to navigate to external websites) will not be possible by design.
Scoring is based on the outcome of performing the tasks stated in the lab. In other words, it doesn't matter how you accomplish the task, if you successfully perform it, you will earn credit for that task.
Labs are not timed separately, and this exam may more than one lab that you must complete. You can use as much time as you would like to complete each lab.
But, you should manage your time appropriately to ensure that you are able to complete the lab(s) and all other sections of the exam in the time provided.
Please note that once you submit your work by clicking the Next button within a lab, you will NOT be able to return to the lab.
Username and password -
Use the following login credentials as needed:
To enter your username, place your cursor in the Sign in box and click on the username below.
To enter your password, place your cursor in the Enter password box and click on the password below.
Microsoft 365 Username:
[email protected]
Microsoft 365 Password: [email protected]
If the Microsoft 365 portal does not load successfully in the browser, press CTRL-K to reload the portal in a new browser tab.
The following information is for technical support purposes only:
Lab instance: 11032396 -
You need to create a case that prevents the members of a group named Operations from deleting email messages that contain the word IPO.
To complete this task, sign in to the Microsoft Office 365 admin center.
Answer:
See explanation below.
1. Navigate to the Security & Compliance Center.
2. In the Security & Compliance Center, click eDiscovery > eDiscovery, and then click
Create a case.
3. On the New Case page, give the case a name, type an optional description, and then click Save. The case name must be unique in your organization.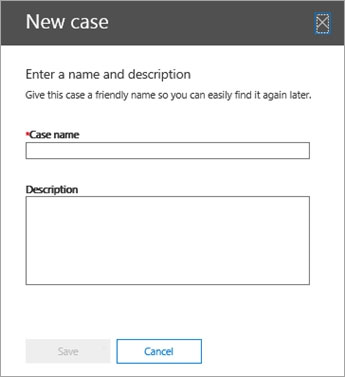
The new case is displayed in the list of cases on the eDiscovery page.
After you create a case, the next step is to add members to the case. The eDiscovery Manager who created the case is automatically added as a member.
Members have to be assigned the appropriate eDiscovery permissions so they can access the case after you add them.
4. In the Security & Compliance Center, click eDiscovery > eDiscovery to display the list of cases in your organization.
5. Click the name of the case that you want to add members to.
The Manage this case flyout page is displayed.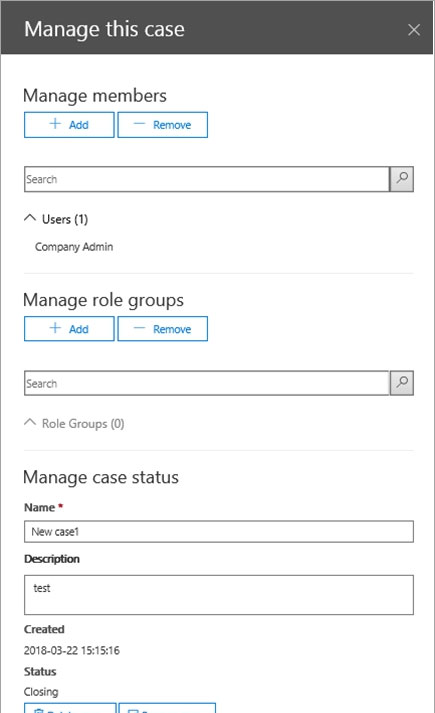
6. Under Manage members, click Add to add members to the case.
You can also choose to add a role group to the case. Under Manage role groups, click Add.
7. In the list of people or role groups that can be added as members of the case, click the check box next to the names of the people or role groups that you want to add.
8. After you select the people or role groups to add as members of the group, click Add.
In Manage this case, click Save to save the new list of case members.
9. Click Save to save the new list of case members.
You can use an eDiscovery case to create holds to preserve content that might be relevant to the case. You can place a hold on the mailboxes and OneDrive for
Business sites of people who are custodians in the case. You can also place a hold on the group mailbox, SharePoint site, and OneDrive for Business site for an
Office 365 Group. Similarly, you can place a hold on the mailboxes and sites that are associated with Microsoft Teams or Yammer Groups. When you place content locations on hold, content is held until you remove the hold from the content location or until you delete the hold.
To create a hold for an eDiscovery case:
1. In the Security & Compliance Center, click eDiscovery > eDiscovery to display the list of cases in your organization.
2. Click Open next to the case that you want to create the holds in.
3. On the Home page for the case, click the Hold tab.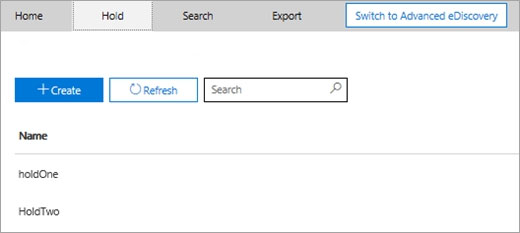
4. On the Hold page, click
Create.
5. On the Name your hold page, give the hold a name. The name of the hold must be unique in your organization.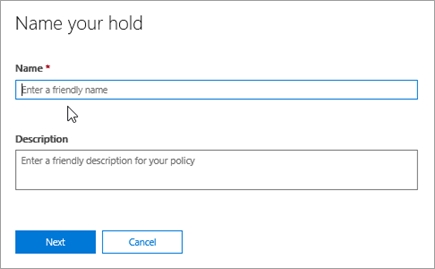
6. (Optional) In the Description box, add a description of the hold.
7. Click Next.
8. Choose the content locations that you want to place on hold. You can place mailboxes, sites, and public folders on hold.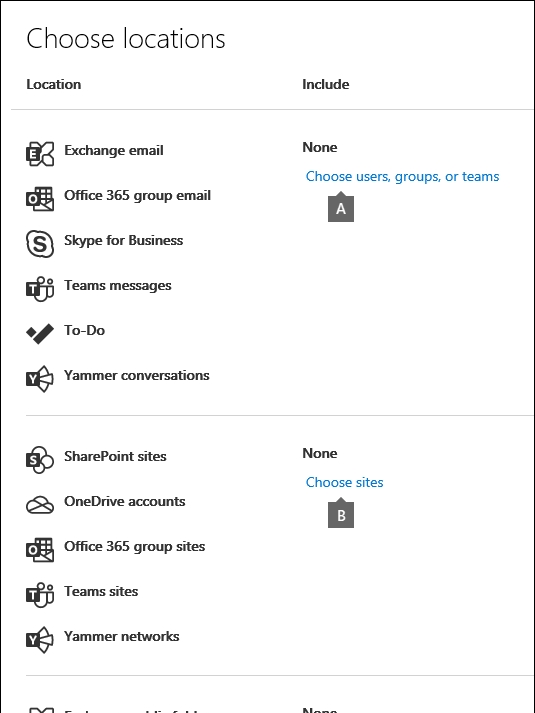 a. Exchange email - Click Choose users, groups, or teams and then click Choose users, groups, or teams again. to specify mailboxes to place on hold. Use the search box to find user mailboxes and distribution groups (to place a hold on the mailboxes of group members) to place on hold. You can also place a hold on the associated mailbox for a Microsoft Team, a Yammer Group, or an Office 365 Group. Select the user, group, team check box, click Choose, and then click
Done.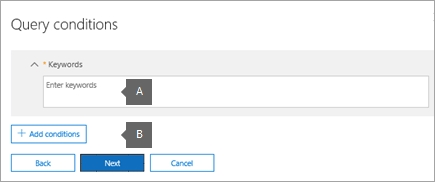 a. In the box under Keywords, type a search query in the box so that only the content that meets the search criteria is placed on hold. You can specify keywords, message properties, or document properties, such as file names. You can also use more complex queries that use a Boolean operator, such as AND, OR, or
NOT. If you leave the keyword box empty, then all content located in the specified content locations will be placed on hold. b. Click Add conditions to add one or more conditions to narrow the search query for the hold. Each condition adds a clause to the KQL search query that is created and run when you create the hold. For example, you can specify a date range so that email or site documents that were created within the date ranged are placed on hold. A condition is logically connected to the keyword query (specified in the keyword box) by the AND operator. That means that items have to satisfy both the keyword query and the condition to be placed on hold.
9. After configuring a query-based hold, click Next.
10. Review your settings, and then click Create this hold.
Reference:
https://docs.microsoft.com/en-us/microsoft-365/compliance/ediscovery-cases?view=o365-worldwide
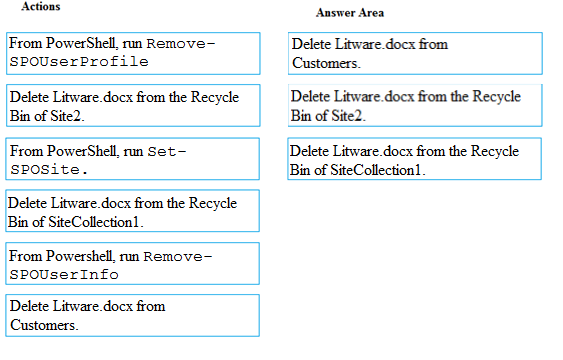
DRAG DROP -
You have a Microsoft 365 subscription.
You have a site collection named SiteCollection1 that contains a site named Site2. Site2 contains a document library named Customers.
Customers contains a document named Litware.docx. You need to remove Litware.docx permanently.
Which three actions should you perform in sequence? To answer, move the appropriate actions from the list of actions to the answer area and arrange them in the correct order.
Select and Place: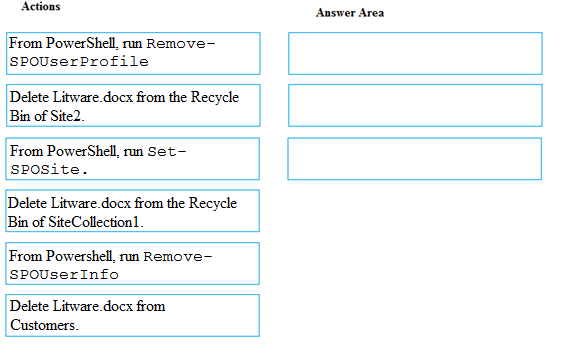
Answer:
HOTSPOT -
You view Compliance Manager as shown in the following exhibit.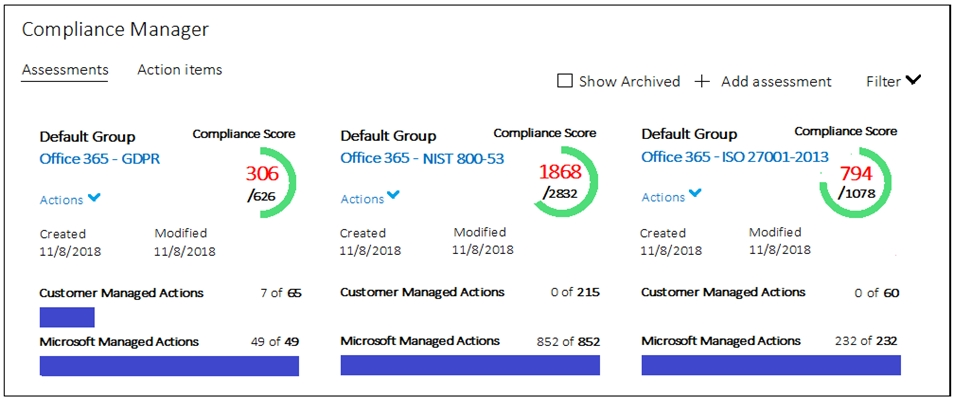
Use the drop-down menus to select the answer choice that completes each statement based on the information presented in the graphic.
NOTE: Each correct selection is worth one point.
Hot Area: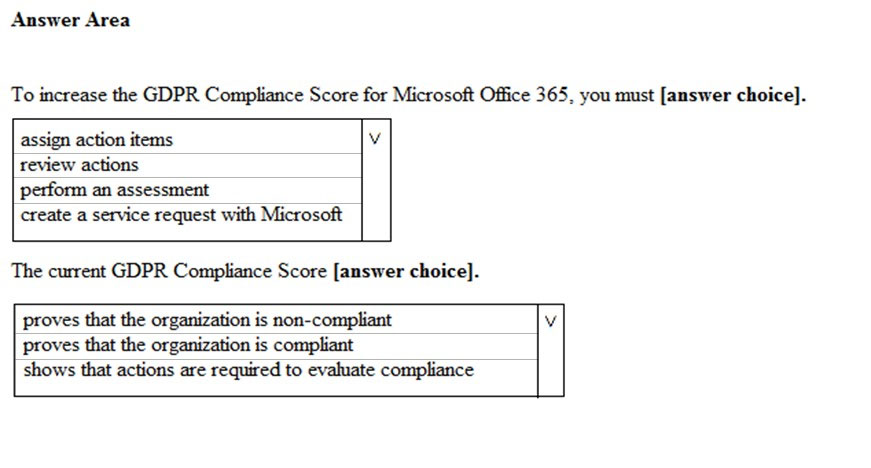
Answer:
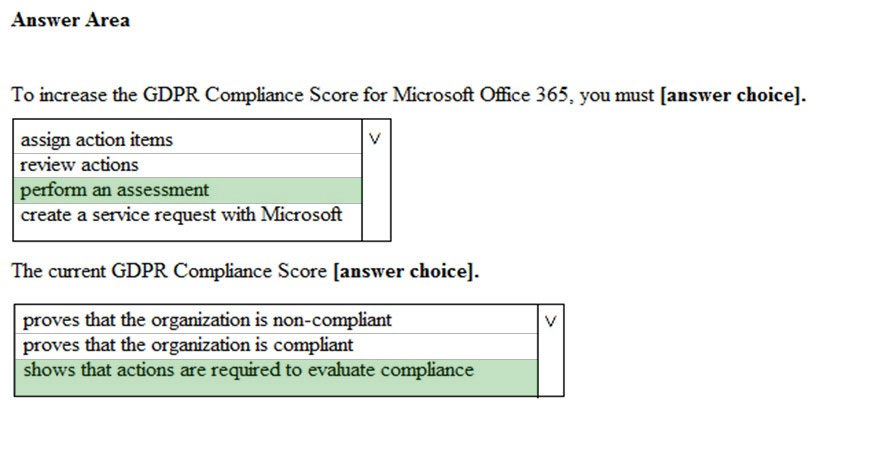
Box 1: perform an assessment -
You can start working with assessments and taking improvement actions to implement controls and improve your compliance score.
Box 2: shows that actions are required to evaluate compliance
Your compliance score measures your progress in completing recommended actions that help reduce risks around data protection and regulatory standards. It does not express an absolute measure of organizational compliance with regard to a particular standard or regulation.
Reference:
https://docs.microsoft.com/en-us/microsoft-365/compliance/compliance-manager-quickstart?view=o365-worldwide https://docs.microsoft.com/en-us/microsoft-365/compliance/compliance-manager-faq?view=o365-worldwide
You have a Microsoft 365 subscription.
All computers run Windows 10 Enterprise and are managed by using Microsoft Endpoint Manager.
You plan to view only security-related Windows telemetry data.
You need to ensure that only Windows security data is sent to Microsoft.
What should you create from the Endpoint Management admin center?
Answer:
A
Reference:
https://docs.microsoft.com/en-us/intune/device-restrictions-windows-10#reporting-and-telemetry
You create a label that encrypts email data. Users report that they cannot use the label in Outlook on the web to protect the email messages they send.
You need to ensure that the users can use the new label to protect their email.
What should you do?
Answer:
C
Admin has to publish labels by creating label policy.
Reference:
https://docs.microsoft.com/en-us/microsoft-365/compliance/sensitivity-labels#what-label-policies-can-do
You have a Microsoft 365 subscription that includes a user named Admin1.
You need to ensure that Admin1 can retain all the mailbox content of users, including their deleted items.
The solution must use the principle of least privilege.
What should you do?
Answer:
A
You have a hybrid Microsoft 365 environment.
All computers run Windows 10 Enterprise and have Microsoft 365 Apps for enterprise installed. All the computers are joined to Active Directory.
You have a server named Server1 that runs Windows Server 2016. Server1 hosts the telemetry database. You need to prevent private details in the telemetry data from being transmitted to Microsoft.
What should you do?
Answer:
C
Your company has a Microsoft 365 subscription that includes a user named User1.
You suspect that User1 sent email messages to a competitor detailing company secrets.
You need to recommend a solution to ensure that in the future you can review any email messages sent by User1 to the competitor, including sent items that were deleted.
What should you include in the recommendation?
Answer:
C
You have a Microsoft 365 subscription.
Yesterday, you created retention labels and published the labels to Microsoft Exchange Online mailboxes.
You need to ensure that the labels will be available for manual assignment as soon as possible.
What should you do?
Answer:
C