You have a computer named Computer1 that runs Windows 11 and hosts two Hyper-V virtual machines named VM1 and VM2.
You need to ensure that VM1 can connect to the network shares on VM2. The solution must prevent Computer1 from establishing network connections to VM1 or VM2.
Which type of virtual switch should you use?
Answer:
B
Note: This question is part of a series of questions that present the same scenario. Each question in the series contains a unique solution that might meet the stated goals. Some question sets might have more than one correct solution, while others might not have a correct solution.
After you answer a question in this section, you will NOT be able to return to it. As a result, these questions will not appear in the review screen.
You have two computers named Computer1 and Computer2 that run Windows 10.
You have an Azure Active Directory (Azure AD) user account named [email protected] that is in the local Administrators group on each computer.
You sign in to Computer1 by using [email protected]
You need to ensure that you can use Event Viewer on Computer1 to connect to the event logs on Computer2.
Solution: On Computer2, you run the winrm quickconfig command.
Does this meet the goal?
Answer:
B
Windows Remote Management is a component of the Windows Hardware Management features that manage server hardware locally and remotely.
Reference:
https://docs.microsoft.com/en-us/windows/win32/winrm/about-windows-remote-management
You deploy Windows 10 to several computers. The computers will be used by users who frequently present their desktop to other users.
You need to prevent applications from generating toast notifications in the notification area.
Which settings should you configure from the Settings app?
Answer:
C
Focus Assist will automatically hide incoming notifications, so they don't pop up and distract you while you're playing a game, giving a presentation, or using a full- screen application.
Incorrect Answers:
A: Shared Experiences allow you to start a task on one device and finish it on another device.
D: Tablet mode makes Windows 10 more touch-friendly when using your device as a tablet.
Reference:
https://www.howtogeek.com/435349/how-to-disable-windows-10s-annoying-focus-assist-notifications/
HOTSPOT -
Your network contains an Active Directory domain named adatum.com. The domain contains two computers named Computer1 and Computer2 that run Windows
10.
The domain contains the user accounts shown in the following table.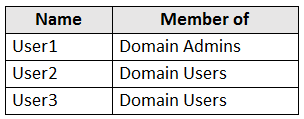
Computer2 contains the local groups shown in the following table.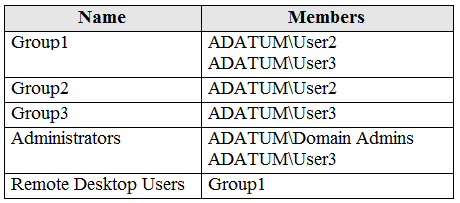
The relevant user rights assignments for Computer2 are shown in the following table.
For each of the following statements, select Yes if the statement is true. Otherwise, select No.
NOTE: Each correct selection is worth one point.
Hot Area: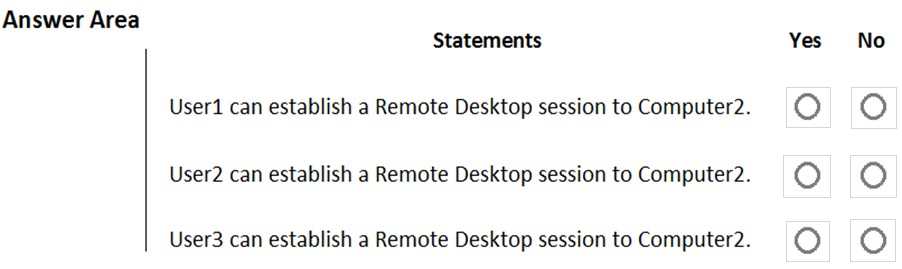
Answer:
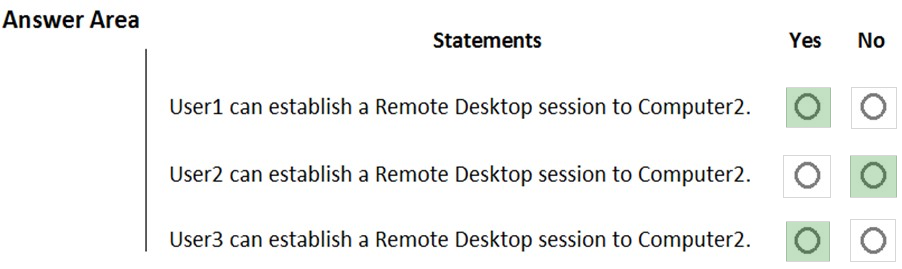
Box 1: Yes -
User1 is an administrator and has the Allow log on through Remote Desktop Services.
Box 2: No -
User2 is a member of Group2 which has the Deny log on through Remote Desktop Services.
Box 3: Yes -
User3 is a member of the administrators group and has the Allow log on through Remote Desktop Services.
Note: Deny permissions take precedence over Allow permissions. If a user belongs to two groups, and one of them has a specific permission set to Deny, that user is not able to perform tasks that require that permission even if they belong to a group that has that permission set to Allow.
Reference:
https://docs.microsoft.com/en-us/azure/devops/organizations/security/about-permissions?view=azure-devops&tabs=preview-page%2Ccurrent-page
SIMULATION -
Please wait while the virtual machine loads. Once loaded, you may proceed to the lab section. This may take a few minutes, and the wait time will not be deducted from your overall test time.
When the Next button is available, click it to access the lab section. In this section, you will perform a set of tasks in a live environment. While most functionality will be available to you as it would be in a live environment, some functionality (e.g., copy and paste, ability to navigate to external websites) will not be possible by design.
Scoring is based on the outcome of performing the tasks stated in the lab. In other words, it doesn't matter how you accomplish the task, if you successfully perform it, you will earn credit for that task.
Labs are not timed separately, and this exam may more than one lab that you must complete. You can use as much time as you would like to complete each lab.
But, you should manage your time appropriately to ensure that you are able to complete the lab(s) and all other sections of the exam in the time provided.
Please note that once you submit your work by clicking the Next button within a lab, you will NOT be able to return to the lab.
Username and password -
Use the following login credentials as needed:
To enter your password, place your cursor in the Enter password box and click on the password below.
Username: Contoso/Administrator -
Password: Passw0rd!
The following information is for technical support purposes only:
Lab Instance: 10921597 -
You need to ensure that Client3 starts in safe mode automatically the next time the computer restarts. After completing the task, you must NOT restart Client3.
To complete this task, sign in to the required computer or computers.
Answer:
See explanation below.
1. From Client3, open the System Configuration utility by pressing the Windows & R keys simultaneously to display the Run box .
2. Type ג€msconfigג€ into the box, and then click OK.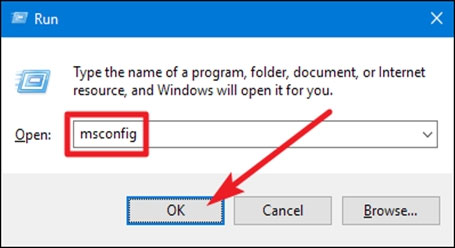
3. In the ג€System Configurationג€ window, switch to the ג€Bootג€ tab.
4. Enable the ג€Safe Bootג€ check box, and then make sure the ג€Minimalג€ option below that is selected. Click the ג€OKג€ button when you're done.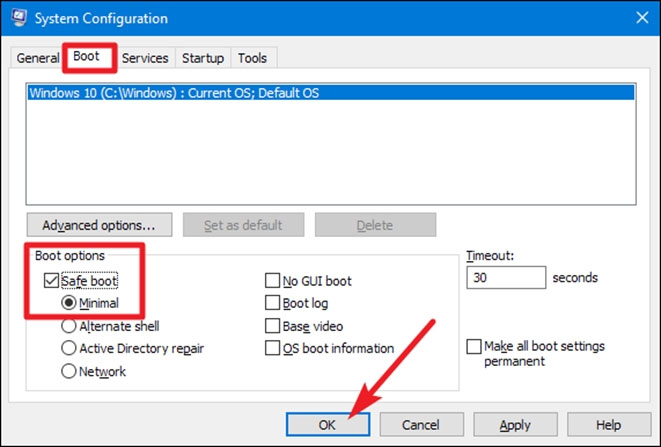
5. You will be prompted to Restart or Exit without restart. Click Exit without restart.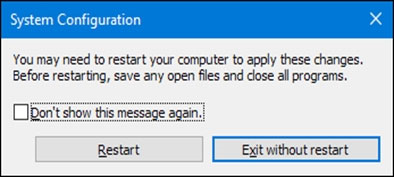
Reference:
https://www.howtogeek.com/howto/windows-vista/force-windows-to-boot-into-safe-mode-without-using-the-f8-key/
SIMULATION -
Please wait while the virtual machine loads. Once loaded, you may proceed to the lab section. This may take a few minutes, and the wait time will not be deducted from your overall test time.
When the Next button is available, click it to access the lab section. In this section, you will perform a set of tasks in a live environment. While most functionality will be available to you as it would be in a live environment, some functionality (e.g., copy and paste, ability to navigate to external websites) will not be possible by design.
Scoring is based on the outcome of performing the tasks stated in the lab. In other words, it doesn't matter how you accomplish the task, if you successfully perform it, you will earn credit for that task.
Labs are not timed separately, and this exam may more than one lab that you must complete. You can use as much time as you would like to complete each lab.
But, you should manage your time appropriately to ensure that you are able to complete the lab(s) and all other sections of the exam in the time provided.
Please note that once you submit your work by clicking the Next button within a lab, you will NOT be able to return to the lab.
Username and password -
Use the following login credentials as needed:
To enter your password, place your cursor in the Enter password box and click on the password below.
Username: Contoso/Administrator -
Password: Passw0rd!
The following information is for technical support purposes only:
Lab Instance: 10921597 -
You need to create a user account named User5 on Client2. The solution must meet the following requirements:
✑ Prevent User5 from changing the password of the account.
✑ Ensure that User5 can perform backups.
✑ Use the principle of least privilege.
To complete this task, sign in to the required computer or computers.
Answer:
See explanation below.
1. On Client2, press the Win + X keys on your keyboard. Then, click or tap the Computer Management option from the menu.
2. Expand the Local Users and Groups from the left side of the window, and select Users.
3. Right-click somewhere on the blank space found in the middle section of the window, and click or tap on New User. This opens the New User window, where you can enter all the details about the new user account.
4. Type the user name and, optionally, its full name and description.
5. Type the password to be used for that user and confirm it.
6. Select the User cannot change password check box.
7. Click Create and Windows immediately creates the user account. When you are done creating user accounts, click Close in the New User window.
1. Press the Win + R keys to open Run, type secpol.msc into Run, and click/tap on OK to open Local Security Policy.
2. Expand open Local Policies in the left pane of Local Security Policy, click/tap on User Rights Assignment, and double click/tap on the Back up files and directories policy in the right pane.
3. Click/tap on the Add User or Group button.
4. Click/tap on the Object Types button.
5. Check all the boxes for Object types, and click/tap on the OK.
6. Click/tap on the Advanced button.
7. Click/tap on the Find Now button, select the name of the user or group
8. Click/tap on OK.
9. Click/tap on OK.
10.When finished, you can close Local Users and Groups.
Reference:
https://www.digitalcitizen.life/geeks-way-creating-user-accounts-and-groups https://docs.microsoft.com/en-us/windows/security/threat-protection/security-policy-settings/user-rights-assignment
SIMULATION -
Please wait while the virtual machine loads. Once loaded, you may proceed to the lab section. This may take a few minutes, and the wait time will not be deducted from your overall test time.
When the Next button is available, click it to access the lab section. In this section, you will perform a set of tasks in a live environment. While most functionality will be available to you as it would be in a live environment, some functionality (e.g., copy and paste, ability to navigate to external websites) will not be possible by design.
Scoring is based on the outcome of performing the tasks stated in the lab. In other words, it doesn't matter how you accomplish the task, if you successfully perform it, you will earn credit for that task.
Labs are not timed separately, and this exam may more than one lab that you must complete. You can use as much time as you would like to complete each lab.
But, you should manage your time appropriately to ensure that you are able to complete the lab(s) and all other sections of the exam in the time provided.
Please note that once you submit your work by clicking the Next button within a lab, you will NOT be able to return to the lab.
Username and password -
Use the following login credentials as needed:
To enter your password, place your cursor in the Enter password box and click on the password below.
Username: Contoso/Administrator -
Password: Passw0rd!
The following information is for technical support purposes only:
Lab Instance: 10921597 -
You need to create a group named Group2 on Client2. The members of Group2 must be able to change the system time. The solution must use the principle of least privilege.
To complete this task, sign in to the required computer or computers.
Answer:
See explanation below.
1. On Client2, Press Windows+R
2. Type lusrmgr.msc
3. Right click Groups and click New Group.
4. Type in the Group name and a description.
5. Click Add to add members to this group. Specify the name of the user or group or computer to be added.
6. Click Create and Close.
1. Press the Win + R keys to open Run, type secpol.msc into Run, and click/tap on OK to open Local Security Policy.
2. Expand open Local Policies in the left pane of Local Security Policy, click/tap on User Rights Assignment, and double click/tap on the Change the system time policy in the right pane.
3. Click/tap on the Add User or Group button.
4. Click/tap on the Object Types button.
5. Check all the boxes for Object types, and click/tap on the OK.
6. Click/tap on the Advanced button.
7. Click/tap on the Find Now button, select the name of the user or group
8. Click/tap on OK.
9. Click/tap on OK.
10.When finished, you can close Local Users and Groups.
Reference:
https://www.windows-active-directory.com/local-user-management.html https://www.tenforums.com/tutorials/92910-allow-prevent-users-groups-change-time-windows-10-a.html#option1
SIMULATION -
Please wait while the virtual machine loads. Once loaded, you may proceed to the lab section. This may take a few minutes, and the wait time will not be deducted from your overall test time.
When the Next button is available, click it to access the lab section. In this section, you will perform a set of tasks in a live environment. While most functionality will be available to you as it would be in a live environment, some functionality (e.g., copy and paste, ability to navigate to external websites) will not be possible by design.
Scoring is based on the outcome of performing the tasks stated in the lab. In other words, it doesn't matter how you accomplish the task, if you successfully perform it, you will earn credit for that task.
Labs are not timed separately, and this exam may more than one lab that you must complete. You can use as much time as you would like to complete each lab.
But, you should manage your time appropriately to ensure that you are able to complete the lab(s) and all other sections of the exam in the time provided.
Please note that once you submit your work by clicking the Next button within a lab, you will NOT be able to return to the lab.
Username and password -
Use the following login credentials as needed:
To enter your password, place your cursor in the Enter password box and click on the password below.
Username: Contoso/Administrator -
Password: Passw0rd!
The following information is for technical support purposes only:
Lab Instance: 11145882 -

Users who attempt to sign in to the domain from Client3 report that the sign-ins fail.
You need to resolve the issue.
To complete this task, sign in to the required computer or computers.
Answer:
See explanation below.
1. Use a local administrator account to log on to the computer.
2. Select Start, press and hold (or right-click) Computer > Properties.
3. Select Change settings next to the computer name.
4. On the Computer Name tab, select Change.
5. Under the Member of heading, select Workgroup, type a workgroup name, and then select OK.
6. When you are prompted to restart the computer, select OK.
7. On the Computer Name tab, select Change again.
8. Under the Member of heading, select Domain, and then type the domain name.
9. Select OK, and then type the credentials of the user who has permissions in the domain.
10.When you are prompted to restart the computer, select OK.
11.Restart the computer.
Reference:
https://support.microsoft.com/en-us/help/2771040/the-trust-relationship-between-this-workstation-and-the-primary-domain
SIMULATION -
Please wait while the virtual machine loads. Once loaded, you may proceed to the lab section. This may take a few minutes, and the wait time will not be deducted from your overall test time.
When the Next button is available, click it to access the lab section. In this section, you will perform a set of tasks in a live environment. While most functionality will be available to you as it would be in a live environment, some functionality (e.g., copy and paste, ability to navigate to external websites) will not be possible by design.
Scoring is based on the outcome of performing the tasks stated in the lab. In other words, it doesn't matter how you accomplish the task, if you successfully perform it, you will earn credit for that task.
Labs are not timed separately, and this exam may more than one lab that you must complete. You can use as much time as you would like to complete each lab.
But, you should manage your time appropriately to ensure that you are able to complete the lab(s) and all other sections of the exam in the time provided.
Please note that once you submit your work by clicking the Next button within a lab, you will NOT be able to return to the lab.
Username and password -
Use the following login credentials as needed:
To enter your password, place your cursor in the Enter password box and click on the password below.
Username: Contoso/Administrator -
Password: Passw0rd!
The following information is for technical support purposes only:
Lab Instance: 11145882 -

You need to ensure that Windows feature updates on Client1 are deferred for 15 days when the updates become generally available.
To complete this task, sign in to the required computer or computers.
Answer:
See explanation below.
1. Select the Start button, then select Settings > Update & Security > Windows Update.
2. Under Update settings, select Advanced options.
3. From the boxes under Choose when updates are installed, select the number of days you would like to defer a feature update or a quality update.
Reference:
https://support.microsoft.com/en-us/help/4026834/windows-10-defer-feature-updates
Note: This question is part of a series of questions that present the same scenario. Each question in the series contains a unique solution that might meet the stated goals. Some question sets might have more than one correct solution, while others might not have a correct solution.
After you answer a question in this section, you will NOT be able to return to it. As a result, these questions will not appear in the review screen.
You have two computers named Computer1 and Computer2 that run Windows 10.
You have an Azure Active Directory (Azure AD) user account named [email protected] that is in the local Administrators group on each computer.
You sign in to Computer1 by using [email protected]
You need to ensure that you can use Event Viewer on Computer1 to connect to the event logs on Computer2.
Solution: On Computer2, you enable the Remote Event Log Management inbound rule from Windows Defender Firewall.
Does this meet the goal?
Answer:
A
Reference:
https://docs.microsoft.com/en-us/previous-versions/windows/it-pro/windows-server-2008-R2-and-2008/cc766438(v=ws.11)?redirectedfrom=MSDN