HOTSPOT -
Your network contains an Active Directory domain named adatum.com, a workgroup, and computers that run Windows 10. The computers are configured as shown in the following table.
The local Administrator accounts on Computer1, Computer2, and Computer3 have the same user name and password.
On Computer1, Windows Defender Firewall is configured as shown in the following exhibit.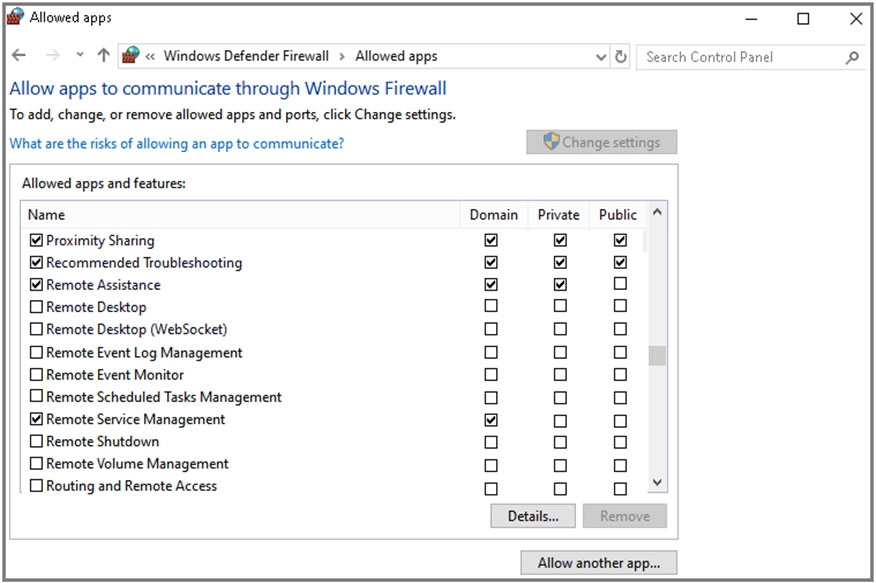
The services on Computer1 have the following states.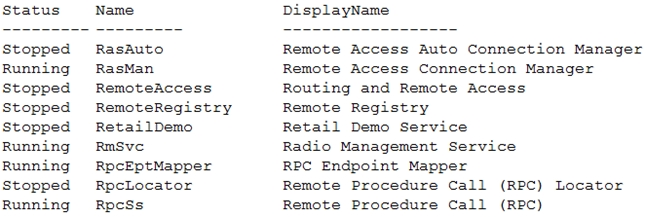
For each of the following statements, select Yes if the statement is true. Otherwise, select No.
NOTE: Each correct selection is worth one point.
Hot Area: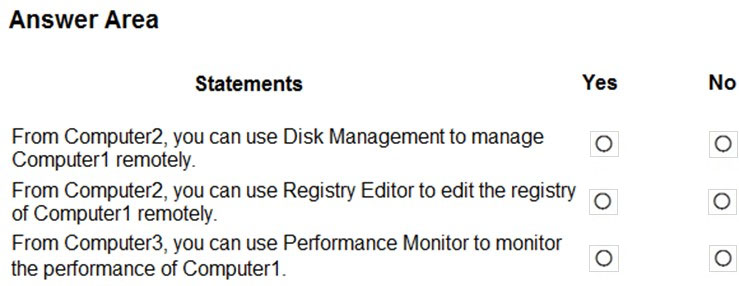
Answer:
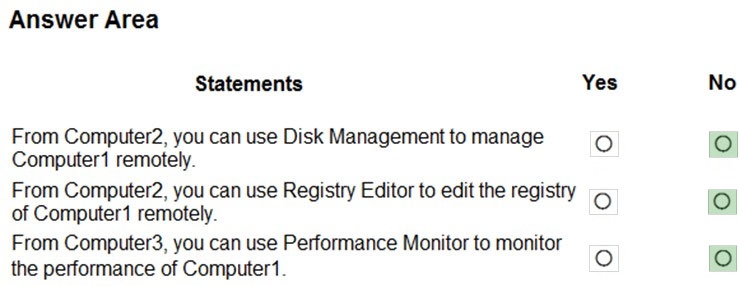
Box 1: No -
Because the firewall is blocking Remote Volume Management.
Box 2: No -
Because the Remote Registry Service is stopped.
Box 3: No -
Because the Remote Registry Service is stopped. Perfmon needs both the RPC service and the Remote Registry service to be running.
Your company has a Remote Desktop Gateway (RD Gateway).
You have a server named Server1 that is accessible by using Remote Desktop Services (RDS) through the RD Gateway.
You need to configure a Remote Desktop connection to connect through the gateway.
Which setting should you configure?
Answer:
D
Note: This question is part of a series of questions that present the same scenario. Each question in the series contains a unique solution that might meet the stated goals. Some question sets might have more than one correct solution, while others might not have a correct solution.
After you answer a question in this section, you will NOT be able to return to it. As a result, these questions will not appear in the review screen.
You have a laptop named Computer1 that runs Windows 10.
When in range, Computer1 connects automatically to a Wi-Fi network named Wireless1.
You need to prevent Computer1 from automatically connecting to Wireless1.
Solution: From the Settings app, you modify the properties of the Wireless1 known Wi-Fi network.
Does this meet the goal?
Answer:
A
Removing Wireless1 as a known Wi-Fi network on Computer1 will prevent it from automatically connecting.
Note: You can also type netsh wlan show profiles in the Command Prompt to manage and delete wireless network profiles.
Reference:
https://kb.netgear.com/29889/How-to-delete-a-wireless-network-profile-in-Windows-10
SIMULATION -
Please wait while the virtual machine loads. Once loaded, you may proceed to the lab section. This may take a few minutes, and the wait time will not be deducted from your overall test time.
When the Next button is available, click it to access the lab section. In this section, you will perform a set of tasks in a live environment. While most functionality will be available to you as it would be in a live environment, some functionality (e.g., copy and paste, ability to navigate to external websites) will not be possible by design.
Scoring is based on the outcome of performing the tasks stated in the lab. In other words, it doesn't matter how you accomplish the task, if you successfully perform it, you will earn credit for that task.
Labs are not timed separately, and this exam may more than one lab that you must complete. You can use as much time as you would like to complete each lab.
But, you should manage your time appropriately to ensure that you are able to complete the lab(s) and all other sections of the exam in the time provided.
Please note that once you submit your work by clicking the Next button within a lab, you will NOT be able to return to the lab.
Username and password -
Use the following login credentials as needed:
To enter your password, place your cursor in the Enter password box and click on the password below.
Username: Contoso/Administrator -
Password: Passw0rd!
The following information is for technical support purposes only:
Lab Instance: 10921597 -
You need to connect to your company's network and create a VPN connection on Client2 named VPN1 that meets the following requirements:
✑ VPN1 must connect to a server named vpn.contoso.com.
✑ Only traffic to your company's network must be routed through VPN1.
To complete this task, sign in to the required computer or computers.
Answer:
See explanation below.
1. On Client2, click on the Start button and go to settings.
2. Select Network & Internet.
3. Select VPN on the left-hand side
4. Click on the Add a VPN connection button.
5. Next, select the VPN providerג€"This will almost always be Windows (built-in).
6. Name your connection and enter the server name as provided by your IT technician. (VPN1 and vpn.contoso.com).
7. Add in your username and password as provided by your IT technician.
8. Click Save when done.
9. Closeout the PC settings windows.
Reference:
https://www.themillergroup.com/vpn-windows-10/
SIMULATION -
Please wait while the virtual machine loads. Once loaded, you may proceed to the lab section. This may take a few minutes, and the wait time will not be deducted from your overall test time.
When the Next button is available, click it to access the lab section. In this section, you will perform a set of tasks in a live environment. While most functionality will be available to you as it would be in a live environment, some functionality (e.g., copy and paste, ability to navigate to external websites) will not be possible by design.
Scoring is based on the outcome of performing the tasks stated in the lab. In other words, it doesn't matter how you accomplish the task, if you successfully perform it, you will earn credit for that task.
Labs are not timed separately, and this exam may more than one lab that you must complete. You can use as much time as you would like to complete each lab.
But, you should manage your time appropriately to ensure that you are able to complete the lab(s) and all other sections of the exam in the time provided.
Please note that once you submit your work by clicking the Next button within a lab, you will NOT be able to return to the lab.
Username and password -
Use the following login credentials as needed:
To enter your password, place your cursor in the Enter password box and click on the password below.
Username: Contoso/Administrator -
Password: Passw0rd!
The following information is for technical support purposes only:
Lab Instance: 10921597 -
You need to ensure that you can successfully ping DC1 from Client3 by using the IP4 address of DC1.
To complete this task, sign in to the required computer or computers.
Answer:
See explanation below.
✑ On Client3, press Windows+R to access Run.
✑ Type cmd and click OK to access the command prompt.
Type ipconfig and press Enter to check that you have a valid IP address.
✑ On Client3, press Windows+R to access Run.
✑ Type cmd and click OK to access the command prompt.
✑ Type "ping" and the IP address of the Domain Controller (e.g. "ping 172.16.1.43").
Reference:
http://www.turn-n-burn.com/DestinyNetworks/Downloads/WebHelp3-1-1/Ping_the_Domain_Controller.htm
SIMULATION -
Please wait while the virtual machine loads. Once loaded, you may proceed to the lab section. This may take a few minutes, and the wait time will not be deducted from your overall test time.
When the Next button is available, click it to access the lab section. In this section, you will perform a set of tasks in a live environment. While most functionality will be available to you as it would be in a live environment, some functionality (e.g., copy and paste, ability to navigate to external websites) will not be possible by design.
Scoring is based on the outcome of performing the tasks stated in the lab. In other words, it doesn't matter how you accomplish the task, if you successfully perform it, you will earn credit for that task.
Labs are not timed separately, and this exam may more than one lab that you must complete. You can use as much time as you would like to complete each lab.
But, you should manage your time appropriately to ensure that you are able to complete the lab(s) and all other sections of the exam in the time provided.
Please note that once you submit your work by clicking the Next button within a lab, you will NOT be able to return to the lab.
Username and password -
Use the following login credentials as needed:
To enter your password, place your cursor in the Enter password box and click on the password below.
Username: Contoso/Administrator -
Password: Passw0rd!
The following information is for technical support purposes only:
Lab Instance: 10921597 -
You need to ensure that a local user named User1 can establish a Remote Desktop connection to Client2.
To complete this task, sign in to the required computer or computers.
Answer:
See explanation below.
Add User to Remote Desktop Users Group via Settings App
1. Open the Settings app on Client2 and go to System -> Remote Desktop. Click on the Select users that can remotely access this PC link on the right side.
2. When the Remote Desktop Users dialog opens, click on Add.
3. Click on Advanced.
4. Click on Find Now and then select any user account you want to add to the ג€Remote Desktop Usersג€ group, and click OK.
5. Click OK and you're done.
Reference:
https://www.top-password.com/blog/add-user-to-remote-desktop-users-group-in-windows-10/
SIMULATION -
Please wait while the virtual machine loads. Once loaded, you may proceed to the lab section. This may take a few minutes, and the wait time will not be deducted from your overall test time.
When the Next button is available, click it to access the lab section. In this section, you will perform a set of tasks in a live environment. While most functionality will be available to you as it would be in a live environment, some functionality (e.g., copy and paste, ability to navigate to external websites) will not be possible by design.
Scoring is based on the outcome of performing the tasks stated in the lab. In other words, it doesn't matter how you accomplish the task, if you successfully perform it, you will earn credit for that task.
Labs are not timed separately, and this exam may more than one lab that you must complete. You can use as much time as you would like to complete each lab.
But, you should manage your time appropriately to ensure that you are able to complete the lab(s) and all other sections of the exam in the time provided.
Please note that once you submit your work by clicking the Next button within a lab, you will NOT be able to return to the lab.
Username and password -
Use the following login credentials as needed:
To enter your password, place your cursor in the Enter password box and click on the password below.
Username: Contoso/Administrator -
Password: Passw0rd!
The following information is for technical support purposes only:
Lab Instance: 11145882 -
You need to prevent user names and passwords from being filled in on forms automatically when a user browses to websites from Client2.
To complete this task, sign in to the required computer or computers.
Answer:
See explanation below.
1. Open the Local Group Policy Editor.
2. In the left pane of Local Group Policy Editor, navigate to Computer Configuration\Administrative Templates\Windows Components\Microsoft Edge
3. In the right pane of Microsoft Edge in Local Group Policy Editor, double click/tap on the Configure Autofill policy to edit it.
4. Select Disabled, click/tap on OK.
5. In the right pane of Microsoft Edge in Local Group Policy Editor, double click/tap on the
6. Configure Password Manager policy to edit it.
7. Select Disabled, click/tap on OK.
8. You can now close the Local Group Policy Editor.
Reference:
https://docs.microsoft.com/en-us/microsoft-edge/deploy/available-policies https://www.tenforums.com/tutorials/115069-enable-disable-autofill-microsoft-edge-windows-10-a.html
SIMULATION -
Please wait while the virtual machine loads. Once loaded, you may proceed to the lab section. This may take a few minutes, and the wait time will not be deducted from your overall test time.
When the Next button is available, click it to access the lab section. In this section, you will perform a set of tasks in a live environment. While most functionality will be available to you as it would be in a live environment, some functionality (e.g., copy and paste, ability to navigate to external websites) will not be possible by design.
Scoring is based on the outcome of performing the tasks stated in the lab. In other words, it doesn't matter how you accomplish the task, if you successfully perform it, you will earn credit for that task.
Labs are not timed separately, and this exam may more than one lab that you must complete. You can use as much time as you would like to complete each lab.
But, you should manage your time appropriately to ensure that you are able to complete the lab(s) and all other sections of the exam in the time provided.
Please note that once you submit your work by clicking the Next button within a lab, you will NOT be able to return to the lab.
Username and password -
Use the following login credentials as needed:
To enter your password, place your cursor in the Enter password box and click on the password below.
Username: Contoso/Administrator -
Password: Passw0rd!
The following information is for technical support purposes only:
Lab Instance: 11145882 -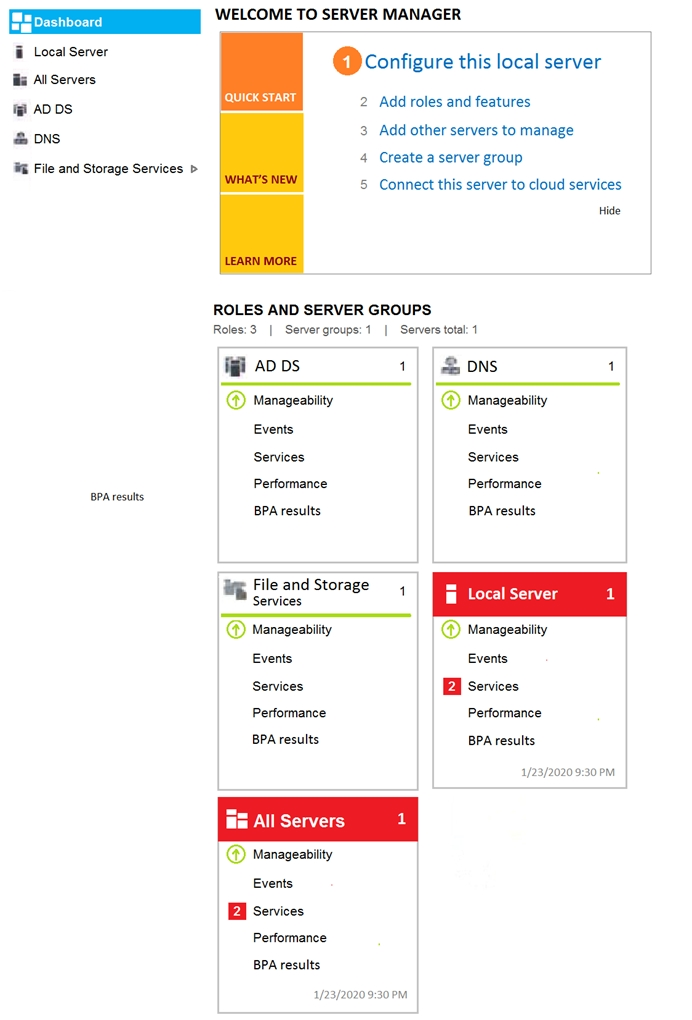
You need to ensure that all the current and future users in the Active Directory domain can establish Remote Desktop connections to Client1. The solution must use the principle of least privilege.
To complete this task, sign in to the required computer or computers.
Answer:
See explanation below.
Step 1. Add Remote Desktop Users to the Remote Desktop Users Group.
1. Open Server Manager.
2. From Tools menu, select Active Directory Users and Computers
3. Double click at your domain on the left and then select Builtin.
4. Open Remote Desktop Users on the right pane.
5. At Members tab, click Add.
6. Type the AD users that you want to give Remote access to the RDS Server and click OK.
7. After selecting the remote desktop users, click OK again to close the window.
Step 2. Allow the log on through remote desktop Services.
1. Open Group Policy Editor. To do that: a. Simultaneously press the Windows
+ R keys to open run command box.
b. Type gpedit.msc and press Enter.
2. In Group Policy Editor navigate to: Computer Configuration > Windows Settings > Security Settings > Local Policies > User Rights Assignment.
3. At the right Pane: double click at Allow log on through Remote Desktop Services.
4. Click Add User or Group.
5. Type remote and then click Check Names.
6. Select the Remote Desktop Users and click OK.
7. Click OK at 'Select users, computersג€¦' window.
8. Finally click OK again and close Group Policy Editor.
Reference:
https://www.wintips.org/fix-to-sign-in-remotely-you-need-the-right-to-sign-in-through-remote-desktop-services-server-2016/
SIMULATION -
Please wait while the virtual machine loads. Once loaded, you may proceed to the lab section. This may take a few minutes, and the wait time will not be deducted from your overall test time.
When the Next button is available, click it to access the lab section. In this section, you will perform a set of tasks in a live environment. While most functionality will be available to you as it would be in a live environment, some functionality (e.g., copy and paste, ability to navigate to external websites) will not be possible by design.
Scoring is based on the outcome of performing the tasks stated in the lab. In other words, it doesn't matter how you accomplish the task, if you successfully perform it, you will earn credit for that task.
Labs are not timed separately, and this exam may more than one lab that you must complete. You can use as much time as you would like to complete each lab.
But, you should manage your time appropriately to ensure that you are able to complete the lab(s) and all other sections of the exam in the time provided.
Please note that once you submit your work by clicking the Next button within a lab, you will NOT be able to return to the lab.
Username and password -
Use the following login credentials as needed:
To enter your password, place your cursor in the Enter password box and click on the password below.
Username: Contoso/Administrator -
Password: Passw0rd!
The following information is for technical support purposes only:
Lab Instance: 11145882 -
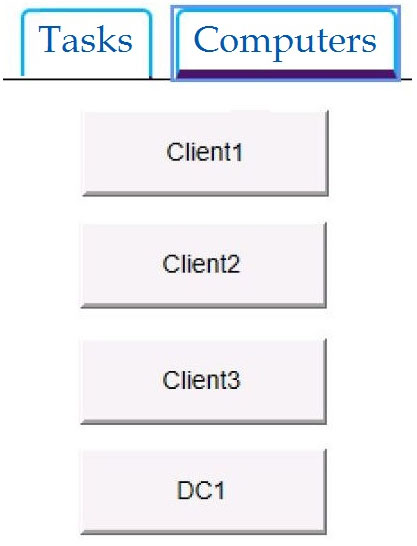
A web service installed on Client1 is used for testing.
You discover that users cannot connect to the web service by using HTTP.
You need to allow inbound HTTP connections to Client1.
To complete this task, sign in to the required computer or computers.
Answer:
See explanation below.
To create an inbound port rule -
1. Open the Group Policy Management Console to Windows Defender Firewall with Advanced Security.
2. In the navigation pane, click Inbound Rules.
3. Click Action, and then click New rule.
4. On the Rule Type page of the New Inbound Rule Wizard, click Custom, and then click Next.
5. On the Program page, click All programs, and then click Next.
6. On the Protocol and Ports page, select the protocol type that you want to allow. To restrict the rule to a specified port number, you must select either TCP or
UDP. Because this is an incoming rule, you typically configure only the local port number. TCP port 80. When you have configured the protocols and ports, click Next.
7. On the Scope page, you can specify that the rule applies only to network traffic to or from the IP addresses entered on this page. Configure as appropriate for your design, and then click Next.
8. On the Action page, select Allow the connection, and then click Next.
9. On the Profile page, select the network location types to which this rule applies, and then click Next.
10.On the Name page, type a name and description for your rule, and then click Finish.
Reference:
https://docs.microsoft.com/en-us/windows/security/threat-protection/windows-firewall/create-an-inbound-port-rule https://en.wikipedia.org/wiki/List_of_TCP_and_UDP_port_numbers
SIMULATION -
Please wait while the virtual machine loads. Once loaded, you may proceed to the lab section. This may take a few minutes, and the wait time will not be deducted from your overall test time.
When the Next button is available, click it to access the lab section. In this section, you will perform a set of tasks in a live environment. While most functionality will be available to you as it would be in a live environment, some functionality (e.g., copy and paste, ability to navigate to external websites) will not be possible by design.
Scoring is based on the outcome of performing the tasks stated in the lab. In other words, it doesn't matter how you accomplish the task, if you successfully perform it, you will earn credit for that task.
Labs are not timed separately, and this exam may more than one lab that you must complete. You can use as much time as you would like to complete each lab.
But, you should manage your time appropriately to ensure that you are able to complete the lab(s) and all other sections of the exam in the time provided.
Please note that once you submit your work by clicking the Next button within a lab, you will NOT be able to return to the lab.
Username and password -
Use the following login credentials as needed:
To enter your password, place your cursor in the Enter password box and click on the password below.
Username: Contoso/Administrator -
Password: Passw0rd!
The following information is for technical support purposes only:
Lab Instance: 11145882 -
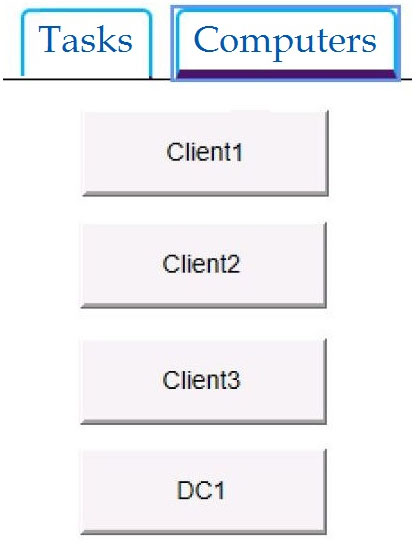
Administrators report that they cannot use Event Viewer to remotely view the event logs on Client3.
You need to ensure that the administrators can access the event logs remotely on Client3. The solution must ensure that Windows Firewall remains enabled.
To complete this task, sign in to the required computer or computers.
Answer:
See explanation below.
1. Go to Control Panel -> System and Security -> Windows Firewall.
2. Click on the Advanced settings link in the left-hand side.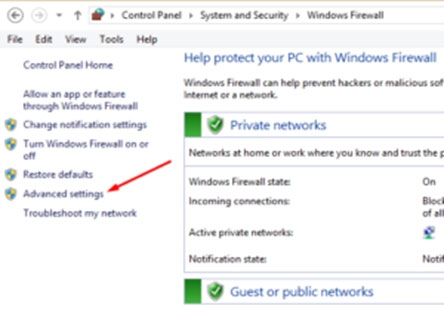
3. Enable COM+ Network Access (DCOM-In).
4. Enable all the rules in the Remote Event Log Management group.
Reference:
https://www.zubairalexander.com/blog/unable-to-access-event-viewer-on-a-remote-computer/