HOTSPOT -
You have the Microsoft Azure Information Protection conditions shown in the following table.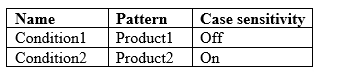
You have the Azure Information Protection labels shown in the following table.
You have the Azure Information Protection policies shown in the following table.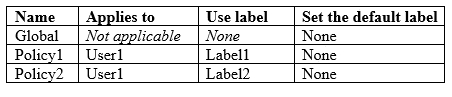
For each of the following statements, select Yes if the statement is true. Otherwise, select No.
NOTE: Each correct selection is worth one point.
Hot Area: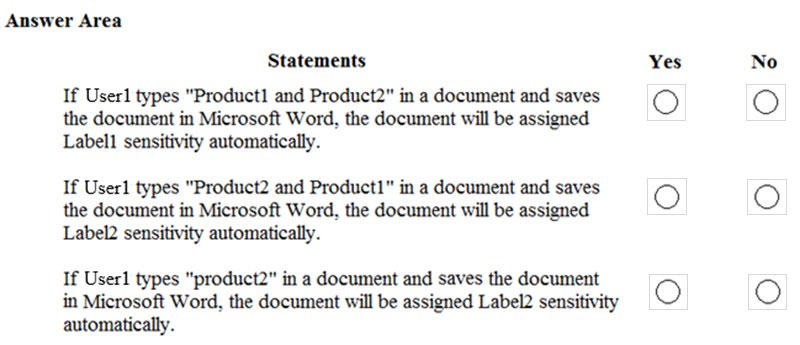
Answer:
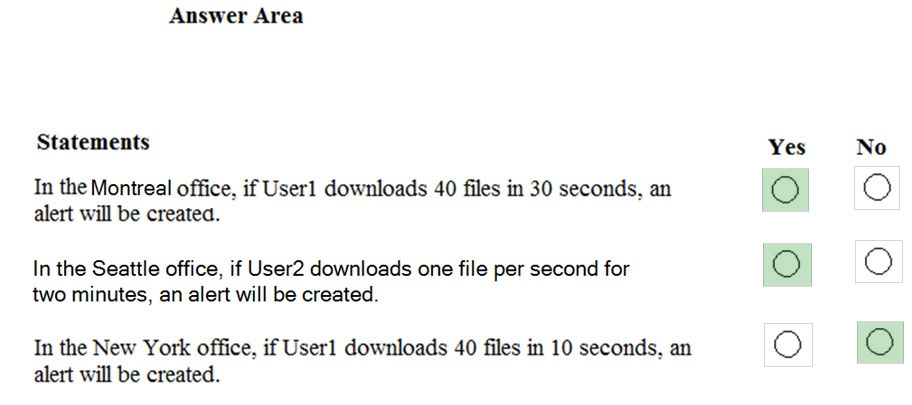
HOTSPOT -
Your company has a Microsoft 365 subscription, a Microsoft Azure subscription, and an Azure Active Directory (Azure AD) tenant named contoso.com.
The company has the offices shown in the following table.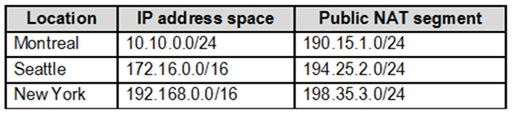
The tenant contains the users shown in the following table.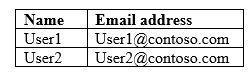
You create the Microsoft Cloud App Security policy shown in the following exhibit.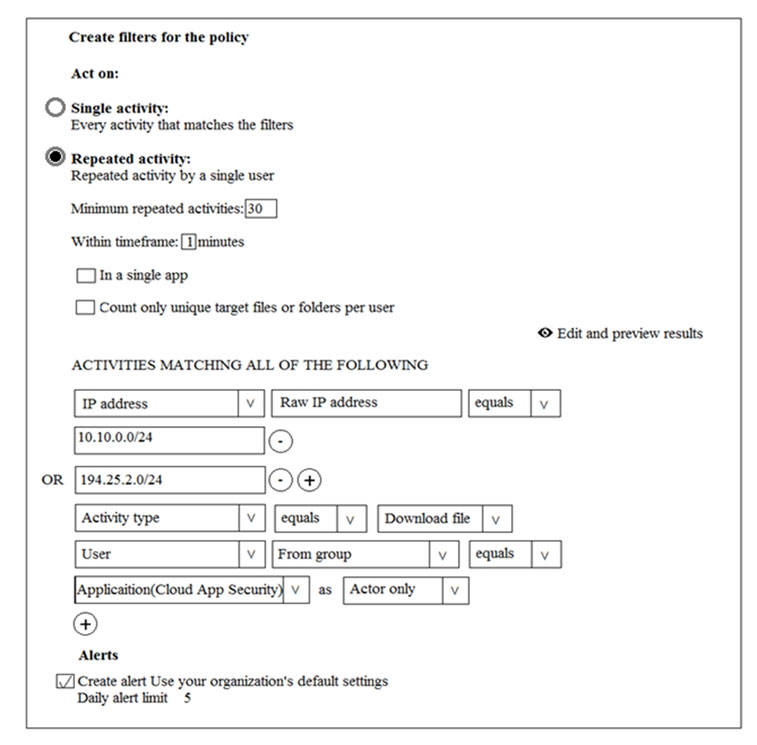
For each of the following statements, select Yes if the statement is true. Otherwise, select No.
NOTE: Each correct selection is worth one point.
Hot Area:
Answer:
A user stores the following files in Microsoft OneDrive:
✑ File.docx
✑ ImportantFile.docx
✑ File_Important.docx
You create a Microsoft Cloud App Security file policy Policy1 that has the filter shown in the following exhibit.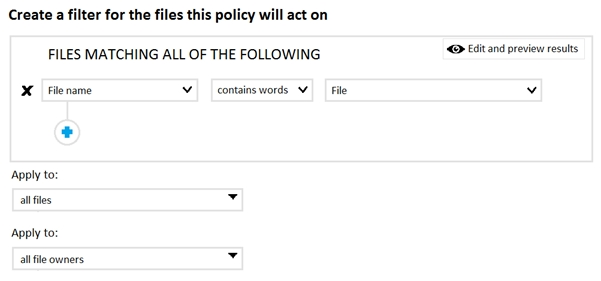
To which files does Policy1 apply?
Answer:
B
Reference:
https://docs.microsoft.com/en-us/cloud-app-security/file-filters
SIMULATION -
You need to create an Azure Information Protection label to meet the following requirements:
✑ Content must expire after 21 days.
✑ Offline access must be allowed for 21 days only.
✑ Documents must be protected by using a cloud key.
✑ Authenticated users must be able to view content only.
To complete this task, sign in to the Microsoft 365 admin center.
Answer:
See explanation below.
1. If you haven't already done so, open a new browser window and sign in to the Azure portal. Then navigate to the Azure Information Protection pane.
For example, in the search box for resources, services, and docs: Start typing Information and select Azure Information Protection.
2. From the Classifications > Labels menu option: On the Azure Information Protection - Labels pane, select the label you want to change.
✑ On the Label pane, locate Set permissions for documents and emails containing this label, and select Protect.
3. Select Protection.
4. On the Protection pane, select Azure (cloud key).
5. Select Set permissions to define new protection settings in this portal.
6. If you selected Set permissions for Azure (cloud key), this option lets you select users and usage rights.
To specify the users that you want to be able to open protected documents and emails, select Add permissions. Then on the Add permissions pane, select the first set of users and groups who will have rights to use the content that will be protected by the selected label:
Choose Select from the list where you can then add all users from your organization by selecting Add <organization name> - All members. This setting excludes guest accounts. Or, you can select Add any authenticated users, or browse the directory.
When you choose all members or browse the directory, the users or groups must have an email address. In a production environment, users and groups nearly always have an email address, but in a simple testing environment, you might need to add email addresses to user accounts or groups.
✑ Change the File Content Expiration setting to 21 days.
✑ Change the Allow offline access setting to 21 days.
When you have finished configuring the permissions and settings, click OK.
This grouping of settings creates a custom template for the Azure Rights Management service. These templates can be used with applications and services that integrate with Azure Rights Management.
7. Click OK to close the Protection pane and see your choice of User defined or your chosen template display for the Protection option in the Label pane.
8. On the Label pane, click Save.
9. On the Azure Information Protection pane, use the PROTECTION column to confirm that your label now displays the protection setting that you want:
✑ A check mark if you have configured protection.
✑ An x mark to denote cancellation if you have configured a label to remove protection.
✑ A blank field when protection is not set.
When you clicked Save, your changes are automatically available to users and services. There's no longer a separate publish option.
Reference:
https://docs.microsoft.com/en-us/azure/information-protection/configure-policy-protection
You have a Microsoft 365 subscription.
You have a Microsoft SharePoint Online site named Site1.
You have a Data Subject Request (DSR) case named Case1 that searches Site1.
You create a new sensitive information type.
You need to ensure that Case1 returns all the documents that contain the new sensitive information type.
What should you do?
Answer:
D
SIMULATION -
You need to ensure that a user named Allan Deyoung can perform searches and place holds on mailboxes, SharePoint Online sites, and OneDrive for Business locations. The solution must use the principle of least privilege.
To complete this task, sign in to the Microsoft 365 admin center.
Answer:
See explanation below.
1. After signing in to the Microsoft 365 admin center, navigate to the Security & Compliance Center.
2. In the left pane of the security and compliance center, select Permissions, and then select the checkbox next to eDiscovery Manager.
3. On the eDiscovery Manager flyout page, do one of the following based on the eDiscovery permissions that you want to assign.
To make a user an eDiscovery Manager: Next to eDiscovery Manager, select Edit. In the Choose eDiscovery Manager section, select the Choose eDiscovery Manager hyperlink, and then select + Add. Select the user (or users) you want to add as an eDiscovery manager, and then select Add. When you're finished adding users, select Done. Then, on the Editing Choose eDiscovery Manager flyout page, select Save to save the changes to the eDiscovery Manager membership.
Reference:
https://docs.microsoft.com/en-us/microsoft-365/compliance/assign-ediscovery-permissions?view=o365-worldwide
SIMULATION -
You need to prevent any email messages that contain data covered by the U.K. Data Protection Act from being sent to recipients outside of your organization, unless the messages are sent to an external domain named adatum.com.
To complete this task, sign in to the Microsoft 365 admin center.
Answer:
See explanation below.
1. After signing into the Microsoft 365 admin center, navigate to Compliance Management in the Exchange Admin center.
2. Click on ג€Data Loss Preventionג€ option.
3. To add a new custom DLP policy, Click on (+) plus button to get the context menu
4. Click on ג€New Custom DLP policyג€ option, a new window appears where you have to enter policy name, description, state and mode of the requirement details.
Click on save button to create policy and continueג€¦
5. You will be back to the ג€Data Loss Preventionג€ screen with newly added policy information.
6. Double click on the added row to open the policy details, click on rules option in left part of the screen as depicted
7. Click on (+) plus button to add a new rule. Select the ג€Block messages with sensitive informationג€ rule.
8. On the following screen, we can add condition, action, exceptions, rule activation and deactivation dates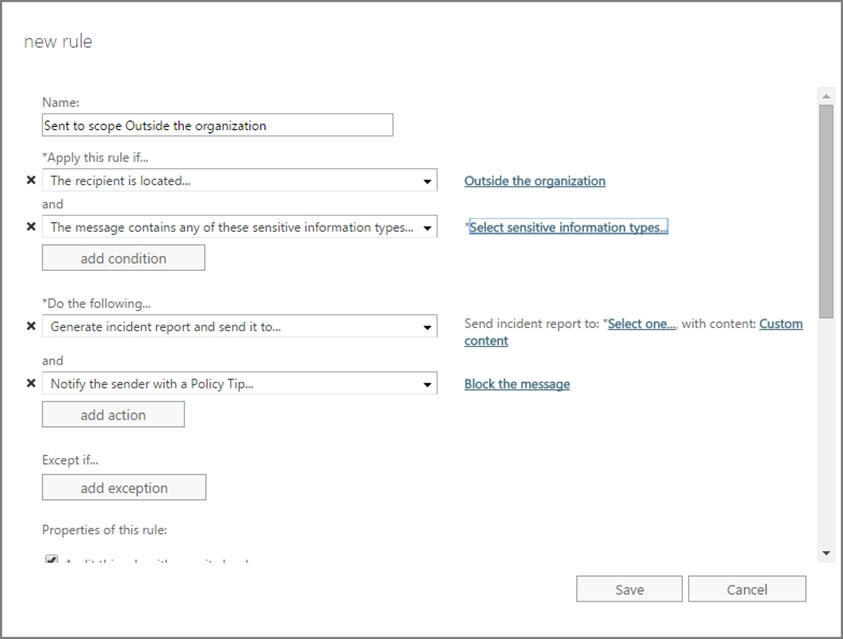
9. Click on ג€Select Sensitive information Typesג€ to specify the sensitive information details.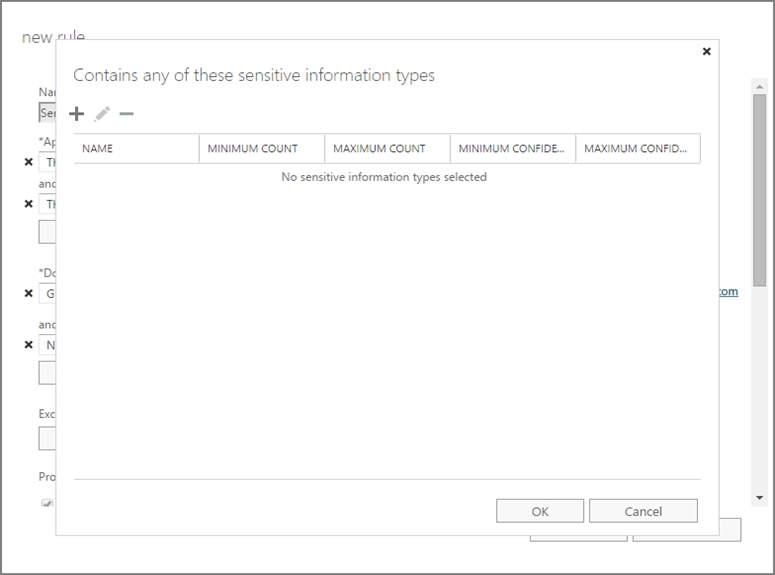
10. Click on (+) plus button and add the following Sensitive information Types:
✑ U.K. National Insurance Number (NINO
✑ U.S. / U.K. Passport Number
✑ SWIFT Code
11. Click on Ok
12. Add an exception for recipients in the adatum.com domain
13. Add recipients for incident reports and click ok
14. Click save
15. Click save
Reference:
https://events.collab365.community/configure-data-loss-prevention-policies-in-exchange-online-in-office-365/
SIMULATION -
You need to ensure that a user named Allan Deyoung receives incident reports when email messages that contain data covered by the U.K. Data Protection Act are sent outside of your organization.
To complete this task, sign in to the Microsoft 365 admin center.
Answer:
See explanation below.
1. In the Security & Compliance Center > left navigation > Data loss prevention > Policy > + Create a policy.
2. Choose the U.K. Data Protection Act template > Next.
3. Name the policy > Next.
4. Choose All locations in Office 365 > Next.
5. At the first Policy Settings step just accept the defaults,
6. After clicking Next, you'll be presented with an additional Policy Settings page
Deselect the Show policy tips to users and send them an email notification option.
Select the Detect when content that's being shared contains option, and configure the number instances to be 10.
Select the Send incident reports in email option.
Select the Choose what to include in the report and who receives it link to add Allan Deyoung as a recipient.
7. > Next
8. Select the option to turn on the policy right away > Next.
9. Click Create to finish creating the policy.
Reference:
https://docs.microsoft.com/en-us/microsoft-365/compliance/create-test-tune-dlp-policy?view=o365-worldwide https://docs.microsoft.com/en-us/microsoft-365/compliance/data-loss-prevention-policies?view=o365-worldwide https://docs.microsoft.com/en-us/microsoft-365/compliance/what-the-dlp-policy-templates-include?view=o365-worldwide
SIMULATION -
You need to ensure that a global administrator is notified when a document that contains U.S. Health Insurance Portability and Accountability Act (HIPAA) data is identified in your Microsoft 365 tenant.
To complete this task, sign in to the Microsoft Office 365 admin center.
Answer:
See explanation below.
1. In the Security & Compliance Center > left navigation > Data loss prevention > Policy > + Create a policy.
2. Choose the U.S. Health Insurance Portability and Accountability Act (HIPAA) template > Next.
3. Name the policy > Next.
4. Choose All locations in Office 365 > Next.
5. At the first Policy Settings step just accept the defaults,
6. After clicking Next, you'll be presented with an additional Policy Settings page
✑ Deselect the Show policy tips to users and send them an email notification option.
✑ Select the Detect when content that's being shared contains option, and decrease the number of instances to 1.
✑ Select the Send incident reports in email option.
7. > Next
8. Select the option to turn on the policy right away > Next.
9. Click Create to finish creating the policy.
References:
https://docs.microsoft.com/en-us/microsoft-365/compliance/create-test-tune-dlp-policy?view=o365-worldwide https://docs.microsoft.com/en-us/microsoft-365/compliance/data-loss-prevention-policies?view=o365-worldwide https://docs.microsoft.com/en-us/microsoft-365/compliance/what-the-dlp-policy-templates-include?view=o365-worldwide
DRAG DROP -
You have a Microsoft 365 subscription.
You need to include a custom sensitive information type in Data Subject Request (DSR) cases.
Which four actions should you perform in sequence? To answer, move the appropriate actions from the list of actions to the answer area and arrange them in the correct order.
Select and Place: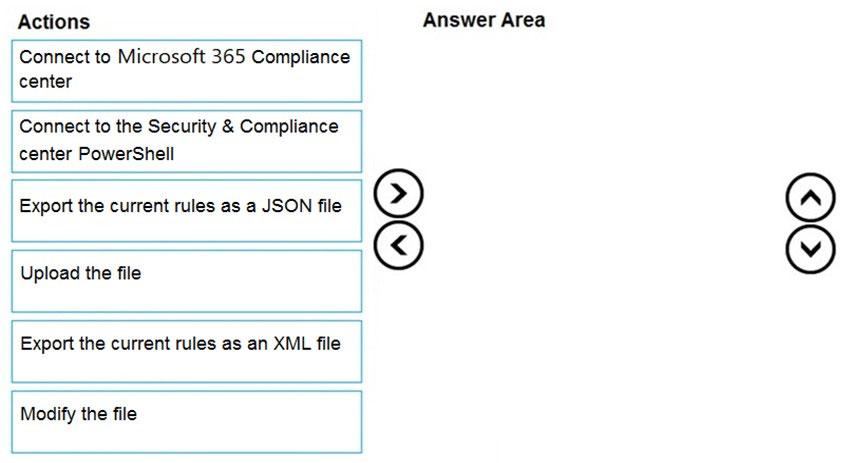
Answer:
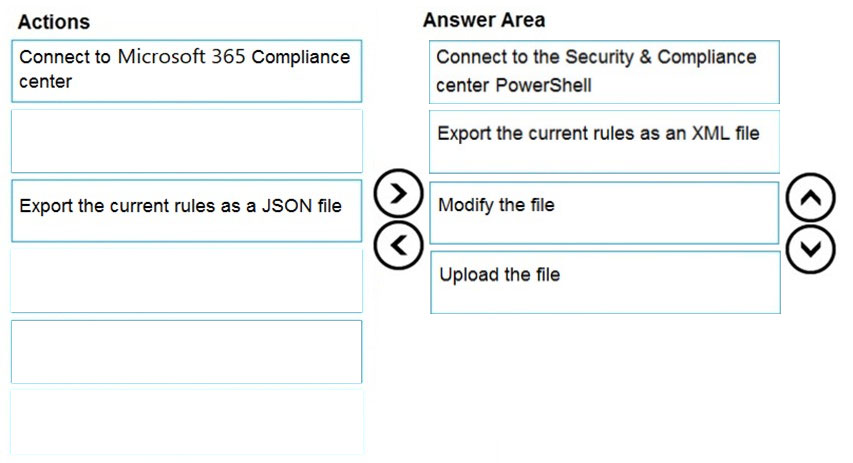
Reference:
https://docs.microsoft.com/en-us/microsoft-365/compliance/customize-a-built-in-sensitive-information-type?view=o365-worldwide