DRAG DROP -
Your company has two departments named department1 and department2 and a Microsoft 365 E5 subscription.
You need to prevent communication between the users in department1 and the users in department2.
How should you complete the PowerShell script? To answer, drag the appropriate values to the correct targets. Each value may be used once, more than once, or not at all. You may need to drag the split bar between panes or scroll to view content.
NOTE: Each correct selection is worth one point.
Select and Place:
Answer:

Box 1: New-OrganizationSegment -
Use the New-OrganizationSegment cmdlet to create organization segments for use with information barrier policies in the Microsoft Purview compliance portal.
Organization Segments are not in effect until you apply information barrier policies.
Syntax:
New-OrganizationSegment -
[-Name] <String>
-UserGroupFilter <String>
[-Confirm]
[-WhatIf]
[<CommonParameters>]
Box 2: New-InformationBarrierPolicy
To define your first blocking policy, use the New-InformationBarrierPolicy cmdlet with the SegmentsBlocked parameter.
Reference:
https://docs.microsoft.com/en-us/powershell/module/exchange/new-organizationsegment https://docs.microsoft.com/en-us/microsoft-365/compliance/information-barriers-policies
You have a Microsoft 365 E5 subscription that contains the resources shown in the following table.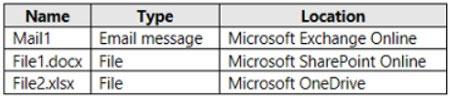
You have a retention label configured as shown in the following exhibit.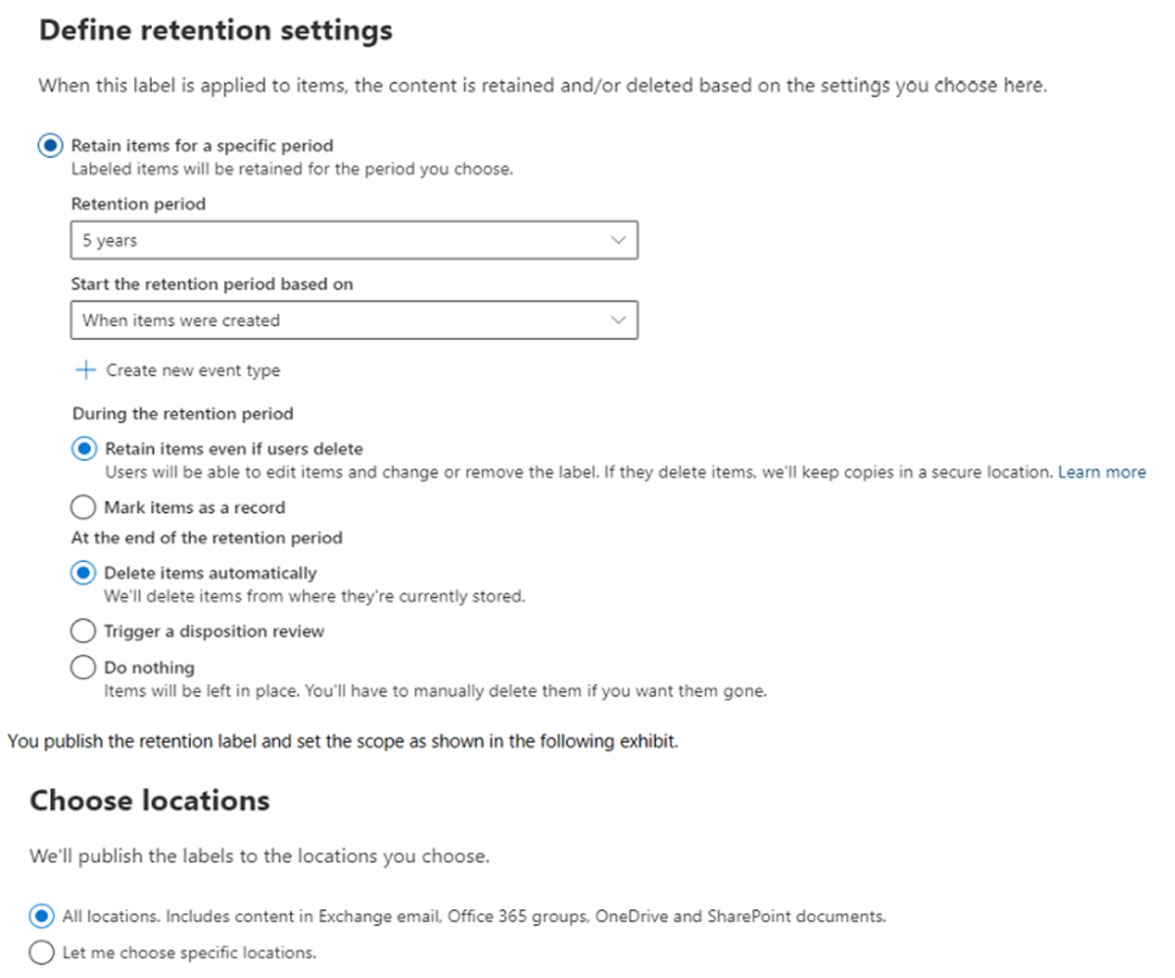
You apply the label to the resources.
Which items can you delete?
Answer:
D
You will be able to choose whether the label should appear in all locations, which includes SharePoint, OneDrive, Office 365 Groups and Exchange email, or you can choose one of those locations in which the label would appear.
Reference:
https://www.sharepointeurope.com/how-retention-works-in-office-365/
You have a Microsoft 365 E5 subscription.
You plan to implement retention policies for Microsoft Teams.
Which item types can be retained?
Answer:
A
Policy-based recording enables organizations that adopt Microsoft Teams for calling and meetings to stipulate, using an administrative policy, when calls and online meetings should be automatically recorded and captured for subsequent processing and retention as required by relevant corporate or regulatory policy.
Reference:
https://docs.microsoft.com/en-us/microsoftteams/teams-recording-policy
You have a Microsoft 365 E5 subscription that contains a Microsoft SharePoint Online site named Site1 and the data loss prevention (DLP) policies shown in the following table.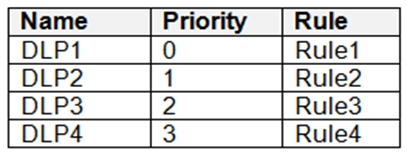
The DLP rules are configured as shown in the following table.
All the policies are assigned to Site1.
You need to ensure that if a user uploads a document to Site1 that matches all the rules, the user will be shown the Tip 2 policy tip.
What should you do?
Answer:
D
The rule with priority 0 is processed first.
Reference:
https://docs.microsoft.com/en-us/microsoft-365/compliance/dlp-policy-reference
HOTSPOT -
You have a Microsoft 365 subscription that uses Microsoft Teams and contains the users shown in the following table.
You have the retention policies shown in the following table.
The users perform the actions shown in the following table.
For each of the following statements, select Yes if the statement is true. Otherwise, select No.
NOTE: Each correct selection is worth one point.
Hot Area: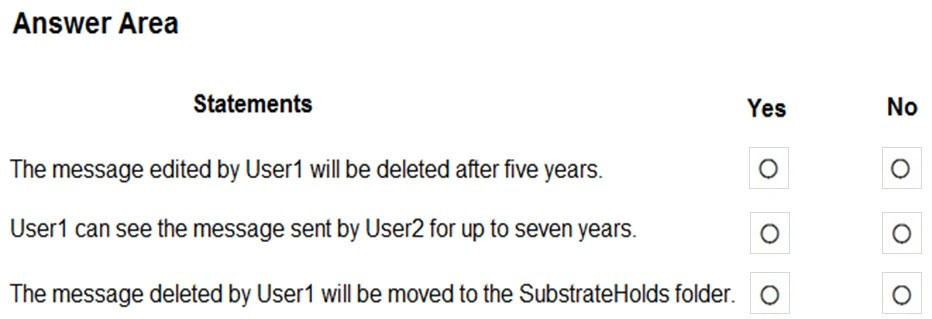
Answer:
Box 1: No -
It will be retained for seven years.
Both Policy1 and Policy2 apply.
If there is a conflict in how long to retain the same content, it is retained in the secured location for the longest retention period.
Note: If you configure a Teams retention policy to retain chats or channel messages, users
Box 2: No -
User2 creates the message in chat. Policy2 applies. The message will be retained for 5 years.
Box 3: Yes -
After a retention policy is configured for chat and channel messages, a timer job from the Exchange service periodically evaluates items in the hidden mailbox folder where these Teams messages are stored. The timer job typically takes 1-7 days to run. When these items have expired their retention period, they are moved to the SubstrateHolds folderג€"another hidden folder that's in every user or group mailbox to store "soft-deleted" items before they're permanently deleted.
Messages remain in the SubstrateHolds folder for at least 1 day, and then if they're eligible for deletion, the timer job permanently deletes them the next time it runs.
Reference:
https://docs.microsoft.com/en-us/microsoftteams/retention-policies https://docs.microsoft.com/en-us/microsoft-365/compliance/retention-policies-teams
HOTSPOT -
You have a Microsoft 365 subscription that contains the users shown in the following table.
Group1 is a member of a group named Group3.
The Azure Active Directory (Azure AD) tenant contains the Windows 10 devices shown in the following table.
Microsoft Endpoint Manager has the devices shown in the following table.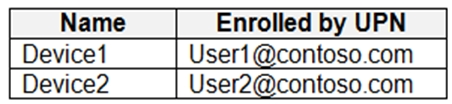
Microsoft Endpoint Manager contains the compliance policies shown in the following table.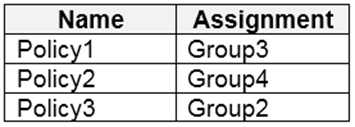
For each of the following statements, select Yes if the statement is true. Otherwise, select No.
NOTE: Each correct selection is worth one point.
Hot Area: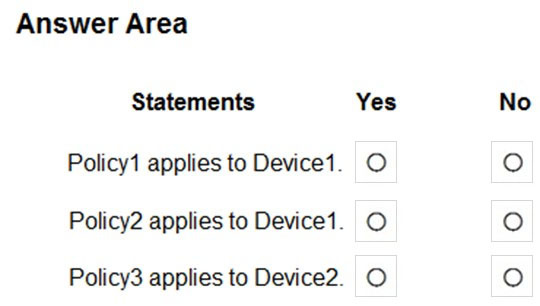
Answer:
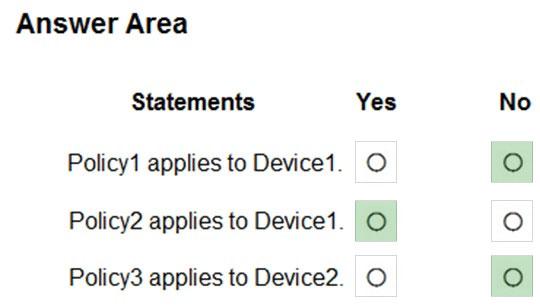
Box 1: No -
Device1 is a member of Group4. Policy2 is assigned to Group 4.
Box 2: Yes -
Device1 is a member of Group4. Policy2 is assigned to Group 4.
Box 3: No -
Policy3 is assigned to Group2.
Device2 is a member of Group5.
Reference:
https://docs.microsoft.com/en-us/mem/intune/protect/device-compliance-get-started
You have a Microsoft 365 E5 subscription.
You need to use Microsoft Defender for Cloud Apps to identify documents stored in Microsoft SharePoint Online that contain proprietary information.
What should you create in Defender for Cloud Apps?
Answer:
A
You connect Microsoft Defender for Cloud Apps to your existing Office 365 account using the app connector API. This connection gives you visibility into and control over Office 365 (including SharePoint Online) use.
The File policy is used for Information protection: File policies enable you to scan your cloud apps for specified files or file types (shared, shared with external domains), data (proprietary information, personal data, credit card information, and other types of data) and apply governance actions to the files (governance actions are cloud-app specific).
Reference:
https://docs.microsoft.com/en-us/defender-cloud-apps/connect-office-365 https://docs.microsoft.com/en-us/defender-cloud-apps/control-cloud-apps-with-policies
You have a Microsoft 365 subscription.
You create a supervision policy named Policy1, and you designate a user named User1 as the reviewer.
What should User1 use to view supervised communications?
Answer:
B
Reference:
https://docs.microsoft.com/en-us/microsoft-365/compliance/supervision-policies?view=o365-worldwide
SIMULATION -
Please wait while the virtual machine loads. Once loaded, you may proceed to the lab section. This may take a few minutes, and the wait time will not be deducted from your overall test time.
When the Next button is available, click it to access the lab section. In this section, you will perform a set of tasks in a live environment. While most functionality will be available to you as it would be in a live environment, some functionality (e.g., copy and paste, ability to navigate to external websites) will not be possible by design.
Scoring is based on the outcome of performing the tasks stated in the lab. In other words, it doesn't matter how you accomplish the task, if you successfully perform it, you will earn credit for that task.
Labs are not timed separately, and this exam may more than one lab that you must complete. You can use as much time as you would like to complete each lab.
But, you should manage your time appropriately to ensure that you are able to complete the lab(s) and all other sections of the exam in the time provided.
Please note that once you submit your work by clicking the Next button within a lab, you will NOT be able to return to the lab.
Username and password -
Use the following login credentials as needed:
To enter your username, place your cursor in the Sign in box and click on the username below.
To enter your password, place your cursor in the Enter password box and click on the password below.
Microsoft 365 Username:
[email protected]
Microsoft 365 Password: [email protected]
If the Microsoft 365 portal does not load successfully in the browser, press CTRL-K to reload the portal in a new browser tab.
The following information is for technical support purposes only:
Lab instance: 11032396 -
You need to ensure that when users tag documents as classified, a classified watermark is applied to the documents.
To complete this task, sign in to the Microsoft Office 365 admin center.
Answer:
See explanation below.
1. In the admin center, select the Security & Compliance admin center.
2. Select Classification > Sensitivity labels.
3. Select Create a label, and when the warning appears, select Yes.
4. Enter a Label name, Tooltip, and Description. Select Next.
5. Turn on Encryption. Choose when you want to assign permissions, whether you want your users' access to the content to expire, and whether you want to allow offline access.
6. Select Assign permissions > Add these email addresses or domains.
7. Enter an email address or domain name (such as Contoso.org). Select Add, and repeat for each email address or domain you want to add.
8. Select Choose permissions from preset or custom.
9. Use the drop-down list to select preset permissions, such as Reviewer or Viewer, or select Custom permissions. If you chose Custom, select the permissions from the list. Select Save >Save > Next.
10. Turn on Content marking, and choose the markings you want to use.
11. For each marking that you choose, select Customize text. Enter the text you want to appear on the document, and set the font and layout options. Select
Save, and then repeat for any additional markings. Select Next.
12. Optionally, turn on Endpoint data loss prevention. Select Next.
13. Optionally, turn on Auto labeling. Add a condition. For example, under Detect content that contains, select Add a condition. Enter the condition; for example, add a condition that if passport, Social Security, or other sensitive information is detected, the label will be added. Select Next.
14. Review your settings, and select Create. Your label has been created. Repeat this process for any additional labels you want.
15. By default, labels appear in Office apps in this order: Confidential, Internal, and Public. To change the order, for each label, select More actions (the ellipsis), and then move the label up or down. Typically, permissions are listed from the lowest to highest level of permissions.
16. To add a sub-label to a label, select More actions, then Add sub level.
17. When finished, choose Publish labels> Choose labels to publish > Add. Select the labels you want to publish, and then select Add > Done > Next.
18. By default, the new label policy is applied to everyone. If you want to limit who the policy is applied to, select Choose users or groups > Add. Select who you want the policy to apply to, and then select Add > Done > Next.
19. If you want a default label for documents and email, select the label you want from the drop-down list. Review the remaining settings, adjust as needed, and then select Next.
20. Enter a Name and Description for your policy. Select Next.
21. Review your settings, then select Publish.
Reference:
https://support.office.com/en-us/article/create-and-manage-sensitivity-labels-2fb96b54-7dd2-4f0c-ac8d-170790d4b8b9 https://docs.microsoft.com/en-us/microsoft-365/compliance/sensitivity-labels?view=o365-worldwide
SIMULATION -
Please wait while the virtual machine loads. Once loaded, you may proceed to the lab section. This may take a few minutes, and the wait time will not be deducted from your overall test time.
When the Next button is available, click it to access the lab section. In this section, you will perform a set of tasks in a live environment. While most functionality will be available to you as it would be in a live environment, some functionality (e.g., copy and paste, ability to navigate to external websites) will not be possible by design.
Scoring is based on the outcome of performing the tasks stated in the lab. In other words, it doesn't matter how you accomplish the task, if you successfully perform it, you will earn credit for that task.
Labs are not timed separately, and this exam may more than one lab that you must complete. You can use as much time as you would like to complete each lab.
But, you should manage your time appropriately to ensure that you are able to complete the lab(s) and all other sections of the exam in the time provided.
Please note that once you submit your work by clicking the Next button within a lab, you will NOT be able to return to the lab.
Username and password -
Use the following login credentials as needed:
To enter your username, place your cursor in the Sign in box and click on the username below.
To enter your password, place your cursor in the Enter password box and click on the password below.
Microsoft 365 Username:
[email protected]
Microsoft 365 Password: [email protected]
If the Microsoft 365 portal does not load successfully in the browser, press CTRL-K to reload the portal in a new browser tab.
The following information is for technical support purposes only:
Lab instance: 11032396 -
You need to ensure that email messages in Exchange Online and documents in SharePoint Online are retained for eight years.
To complete this task, sign in to the Microsoft Office 365 admin center.
Answer:
See explanation below.
NB: For our purposes, the retention period will be 8 years.
For retaining email messages in Exchange Online:
Step 1: Create a retention tag -
1. Navigate to the Exchange Admin Center
2. Navigate to Compliance management > Retention tags, and then click Add +
3. Select one of the following options:
✑ Applied automatically to entire mailbox (default): Select this option to create a default policy tag (DPT). You can use DPTs to create a default deletion policy and a default archive policy, which applies to all items in the mailbox.
✑ Applied automatically to a specific folder: Select this option to create a retention policy tag (RPT) for a default folder such as Inbox or Deleted Items.
✑ Applied by users to items and folders (Personal): Select this option to create personal tags. These tags allow Outlook and Outlook on the web (formerly known as Outlook Web App) users to apply archive or deletion settings to a message or folders that are different from the settings applied to the parent folder or the entire mailbox.
4. The New retention tag page title and options will vary depending on the type of tag you selected. Complete the following fields:
✑ Name: Enter a name for the retention tag. The tag name is for display purposes and doesn't have any impact on the folder or item a tag is applied to. Consider that the personal tags you provision for users are available in Outlook and Outlook on the web.
✑ Apply this tag to the following default folder: This option is available only if you selected Applied automatically to a specific folder.
✑ Retention action: Select one of the following actions to be taken after the item reaches its retention period:
✑ Delete and Allow Recovery: Select this action to delete items but allow users to recover them using the Recover Deleted Items option in Outlook or Outlook on the web. Items are retained until the deleted item retention period configured for the mailbox database or the mailbox user is reached.
✑ Permanently Delete: Select this option to permanently delete the item from the mailbox database.
✑ Move to Archive: This action is available only if you're creating a DPT or a personal tag. Select this action to move items to the user's In-Place Archive.
Retention period: Select one of the following options:
✑ Never: Select this option to specify that items should never be deleted or moved to the archive.
✑ When the item reaches the following age (in days): Select this option and specify the number of days to retain items before they're moved or deleted. The retention age for all supported items except Calendar and Tasks is calculated from the date an item is received or created. Retention age for Calendar and
Tasks items is calculated from the end date.
✑ Comment: User this optional field to enter any administrative notes or comments. The field isn't displayed to users.
Step 2: Create a retention policy
+
1. Navigate to Compliance management > Retention policies, and then click Add
2. In New Retention Policy, complete the following fields:
✑ Name: Enter a name for the retention policy.
+
Retention tags: Click Add -
✑ to select the tags you want to add to this retention policy.
A retention policy can contain the following tags:
✑ One DPT with the Move to Archive action.
✑ One DPT with the Delete and Allow Recovery or Permanently Delete actions.
✑ One DPT for voice mail messages with the Delete and Allow Recovery or Permanently Delete actions.
✑ One RPT per default folder such as Inbox to delete items.
✑ Any number of personal tags.
Step 3: Apply a retention policy to mailbox users
After you create a retention policy, you must apply it to mailbox users. You can apply different retention policies to different set of users.
1. Navigate to Recipients > Mailboxes.
2. In the list view, use the Shift or Ctrl keys to select multiple mailboxes.
3. In the details pane, click More options.
4. Under Retention Policy, click Update.
5. In Bulk Assign Retention Policy, select the retention policy you want to apply to the mailboxes, and then click Save.
For retaining documents in SharePoint Online
Access Compliance Admin Center -
1. Navigate to the Office 365 Admin Centers
2. From the list of available Admin Centers, click on Security & Compliance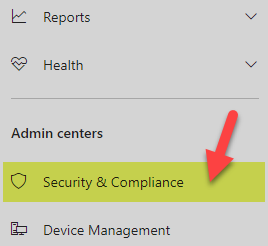
How to create and publish a Retention Policy on a SharePoint site
Now that we are in the Compliance Admin Center, we are ready to create and publish a Retention Policy on a SharePoint site.
Under Data Governance, click Retention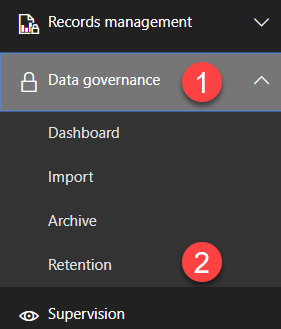
1. Hit Create button to create new Retention Policy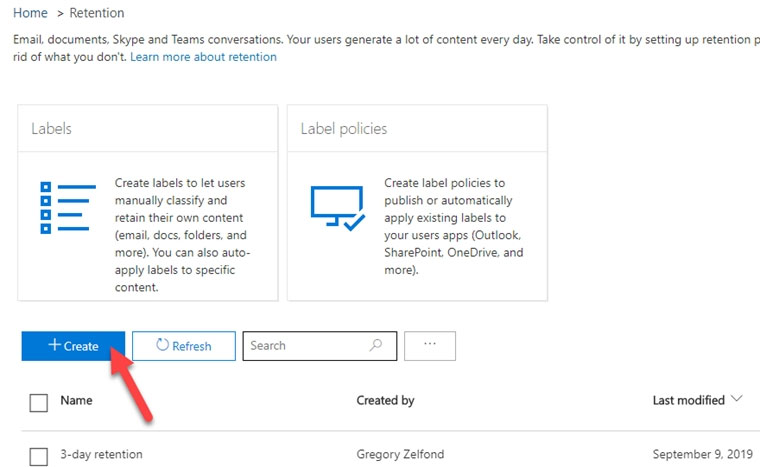
2. Give your policy a name and description. Hit Next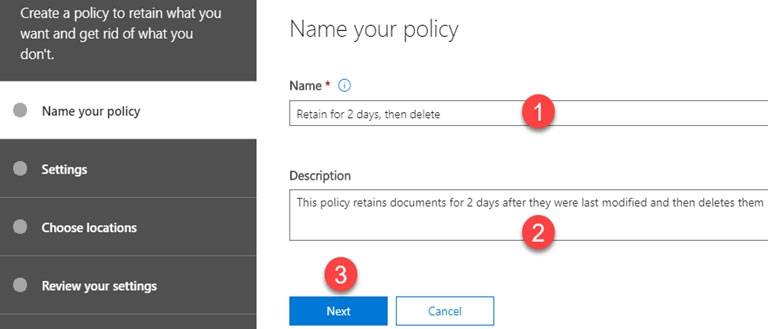
3. On the next screen is where you set up the logic. You can configure how many days, months, or years to retain the content for, specify whether you want the math (retention period) to be calculated from the Created Date or Last Modified Date. Lastly, you can also specify whether you want to keep or delete content after the Retention period expires. Hit Next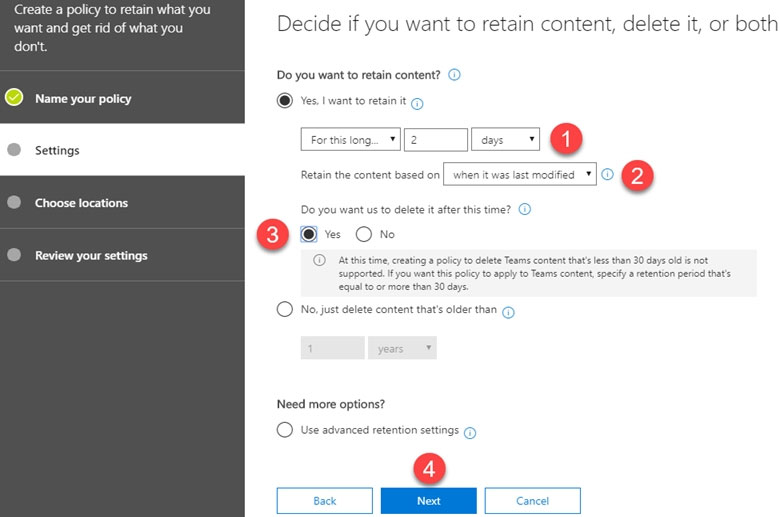
4. On the next screen, you get to choose where to apply the policy. You can apply it to email (Exchange), SharePoint sites, OneDrive accounts as well as Office
365 Groups.
5. In my case, I applied a policy to a single Office 365 Group Site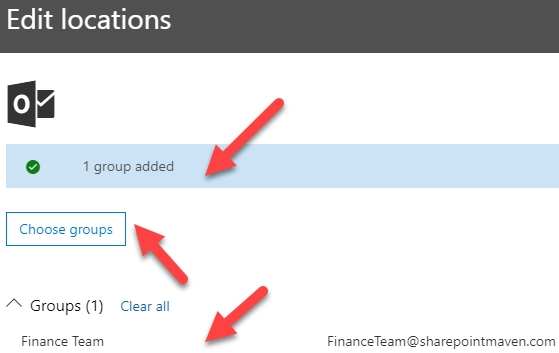
6. On a final screen, you need to review and confirm the settings and click Create this policy button. It is imperative to note the message you get to see at the bottom. It warns you that content might be deleted as soon as the policy takes effect according to the logic you set up in previous steps.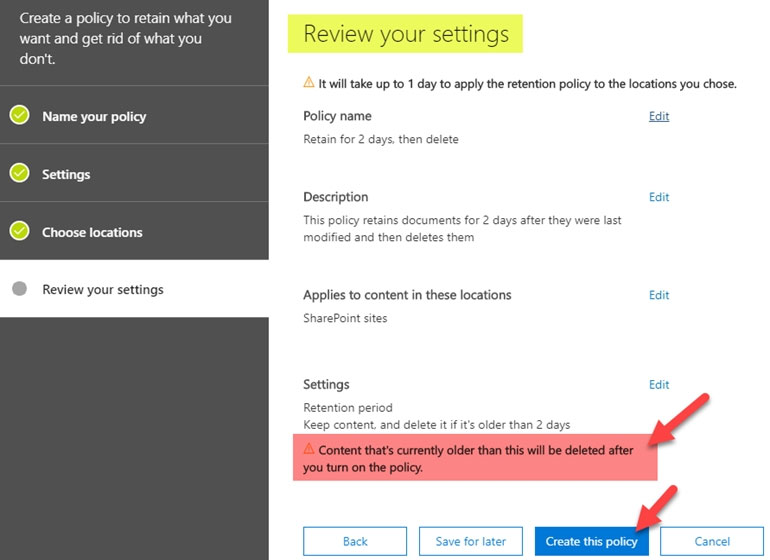
Reference:
https://docs.microsoft.com/en-us/exchange/security-and-compliance/messaging-records-management/create-a-retention-policy#step-2-create-a-retention-policy https://docs.microsoft.com/en-us/exchange/security-and-compliance/messaging-records-management/apply-retention-policy#use-the-eac-to-apply-a-retention- policy-to-multiple-mailboxes https://sharepointmaven.com/how-to-set-a-retention-policy-on-a-sharepoint-site/